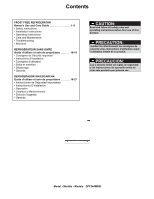
Danby DFF344WDB Product Manual - Page 6
Door Reversal, Instructions
 |
View all Danby DFF344WDB manuals
Add to My Manuals
Save this manual to your list of manuals |
Page 6 highlights
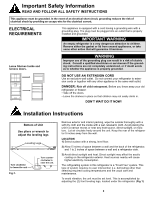
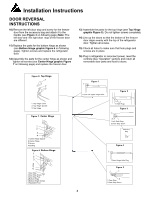
Installation Instructions DOOR REVERSAL INSTRUCTIONS 10) Remove the left door stop and screw for the freezer door from the accessory bag and attach it to the handle (see Figure 3 on following page) Note: The left door and the right door stop of the freezer door are different. 11) Replace the parts for the bottom hinge as shown (see Bottom Hinge graphic Figure 6 on following page). Tighten screws and replace the refrigerator door. 12) Assemble the parts for the center hinge as shown and tighten all screws (see Center Hinge graphic Figure 7 on following page) and replace the freezer door. 13) Assemble the parts for the top hinge (see Top Hinge graphic Figure 8). Do not tighten screws completely. 14) Line up the doors so that the bottom of the freezer door aligns evenly with the top of the refrigerator door. Tighten all screws. 15) Check all holes to make sure that hole plugs and screws are in place. 16) Plug in refrigerator or reconnect power, reset the controls (See "Operation" section) and return all removable door parts and food to doors. Figure 8. Top Hinge 1 2 3 1. Top Hinge Cover 2. Top Hinge Spindle 3. Top Hinge Figure 7. Center Hinge 1 2 3 4 1.Center Hinge Spacer 2.Center Hinge 3.Screws 4.Bushing Figure 6. Bottom Hinge 1 2 3 4 5 6 1.Door Stop 2.Door Stop Screw 3.Door Stop Pole 4.Bottom Hinge 5.Bottom Hinge Screws 6.Adjustable Foot Figure 1 1 1.Cover Of Upper Hinge Holes Figure 2 1 1.Hole Plugs Figure 3 1 2 1.Left Door Stop 2.Door Stop Screw Accessory Bag Figure 4 1 1.Door Hinge Hole Plug Figure 5 1 2 1.Door Stop 2.Door Stop Screw 4
-
 1
1 -
 2
2 -
 3
3 -
 4
4 -
 5
5 -
 6
6 -
 7
7 -
 8
8 -
 9
9 -
 10
10 -
 11
11 -
 12
12 -
13
-
14
-
15
-
16
-
17
-
18
-
19
-
20
-
21
-
22
-
23
-
24
-
25
-
26
-
27
-
28
-
29
-
30
 |
 |
