Danby DPAC7008 User Manual - Page 12
Remote Control Instructions
 |
View all Danby DPAC7008 manuals
Add to My Manuals
Save this manual to your list of manuals |
Page 12 highlights
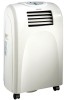
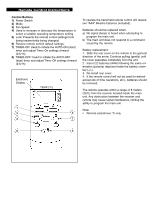
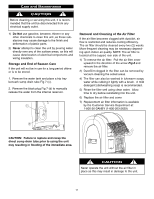
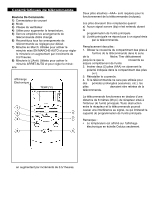
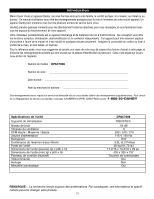
Remote Control Instructions Control Buttons 1) Power Switch 2) Mode 3) Fan Speed 4) Used to increase or decrease the temperature to select a suitable operating temperature setting. 5) Lock: Prevents the remote control settings from being inadvertently being changed. 6) Restore remote control default settings. 7) TIMER-ON: Used to initiate the AUTO-ON (start) timer and adjust Timer On settings forward (0.5/1h) 8) TIMER-OFF: Used to initiate the AUTO-OFF (stop) timer and adjust Timer Off settings forward (0.5/1h) Electronic Display TEMP.(°C) 1 2 4 3 7 To operate the hand held remote control will require two "AAA" Alkaline batteries (included). Batteries should be replaced when: a) No signal (beep) is heard when attempting to program the main unit. b) The main unit does not respond to a command issued by the remote. Battery replacement: 1. Slide the rear cover on the remote in the general direction of the arrow. Continue pulling (gently) until the cover seperates completely from the unit. 2. Insert (2) batteries (AAA) following the same orientation (polarity) depicted inside the battery chamber (+/-). 3. Re-install rear cover. 4. If the remote control will not be used for extended periods of time (vacations, etc.), batteries should be removed. The remote operates within a range of 8 meters (26 ft.) from the receiver located inside the main unit. Any obstruction between the receiver and remote may cause signal interference, limiting the ability to program the main unit. Note: • Remote sets/shows °C only. 6 5
-
 1
1 -
2
-
3
-
4
-
5
-
6
-
 7
7 -
 8
8 -
 9
9 -
 10
10 -
 11
11 -
 12
12 -
 13
13 -
 14
14 -
 15
15 -
 16
16 -
 17
17 -
18
-
19
-
20
-
21
-
22
-
23
-
24
-
25
-
26
-
27
-
28
 |
 |