DeLonghi EAM3200 Owner Manual - Page 24
Cleaning the Brewing System
 |
View all DeLonghi EAM3200 manuals
Add to My Manuals
Save this manual to your list of manuals |
Page 24 highlights
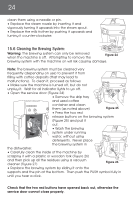
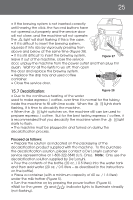
24 clean them using a needle or pin. • Replace the steam nozzle by inserting it and vigorously turning it upwards into the steam spout. • Replace the milk frother by pushing it upwards and turning it counter-clockwise. 15.6 Cleaning the Brewing System: Warning: The brewing system can only be removed when the machine is off. Attempting to remove the Figure 24 brewing system with the machine on will risk causing damage. Note: The brewing system must be cleaned very frequently (depending on use) to prevent it from filling with coffee deposits (that may lead to malfunctions). To clean it, proceed as follows: • Make sure the machine is turned off, but do not unplug it. Wait for all indicator lights to go off. • Open the service door (Figure 24) • Remove the drip tray and used coffee container and clean them (as noted above) Figure 25 • Press the two red release buttons on the brewing system (Figure 25) and pull it out. • Wash the brewing system under running water, without using detergents. Never place the brewing system in the dishwasher. • Carefully clean the inside of the machine by scraping it with a plastic or wooden fork (Figure 26) and then pick up all the residues using a vacuum cleaner (Figure 27) Figure 26 • Replace the brewing system by sliding it onto the supports and the pin at the bottom. Then push the PUSH symbol fully in until you hear a click. Check that the two red buttons have opened back out, otherwise the service door cannot close properly.
-
 1
1 -
2
-
3
-
4
-
5
-
6
-
7
-
8
-
9
-
10
-
11
-
12
-
13
-
14
-
15
-
16
-
17
-
18
-
 19
19 -
 20
20 -
 21
21 -
 22
22 -
 23
23 -
 24
24 -
 25
25 -
 26
26 -
 27
27 -
 28
28 -
 29
29 -
30
-
31
-
32
-
33
-
34
-
35
 |
 |
