DeLonghi EAM3200 Owner Manual - Page 25
Decalcification
 |
View all DeLonghi EAM3200 manuals
Add to My Manuals
Save this manual to your list of manuals |
Page 25 highlights
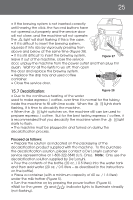
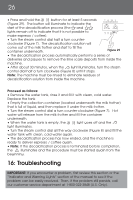
25 • If the brewing system is not inserted correctly until hearing the click, the two red buttons have not opened out properly and the service door will not close, and the machine will not operate. The light will start flashing if this is the case. • If it is difficult to insert the brewing system, squeeze it into size by vigorously pressing from above and below at the same time (Figure 28). • If it is still difficult to insert the brewing system, leave it out of the machine, close the service Figure 27 door, unplug the machine from the power outlet and then plug it in again. Wait for all the lights to go off, then open the door and replace the brewing system. • Replace the drip tray and used coffee container. • Close the service door. 15.7 Decalcification: Figure 28 • Due to the continuous heating of the water used to make espresso / coffee, over time it is normal for the tubing inside the machine to fill with lime scale. When the lights starts flashing, it is time to decalcify the machine. • When the light switches on, the machine still can be used to prepare espresso / coffee. But for the best tasting espresso / coffee, it is recommended that you decalcify the machine when the light starts to flash. • The machine must be plugged in and turned on during the decalcification process. Proceed as follows: • Prepare the solution as indicated on the packaging of the decalcification product supplied with the machine. To the purchase the decalcification solution, please contact a De'Longhi customer service representative at 1-800-322-3848 (U.S. Only). Note: Only use the decalcification solution supplied by De'Longhi. • Pour the contents of the bottle (20 oz. / 0.5 liters) into the water tank and then add water (20 oz. / 0.5 liters - as described in the instructions on the bottle). • Place a container (with a minimum capacity of 60 oz. / 1.5 liters) under the milk frother (Figure 5). • Turn the machine on by pressing the power button (Figure 6). •Wait for the green and indicator lights to illuminate steadily (not flashing).
-
 1
1 -
2
-
3
-
4
-
5
-
6
-
7
-
8
-
9
-
10
-
11
-
12
-
13
-
14
-
15
-
16
-
17
-
18
-
19
-
 20
20 -
 21
21 -
 22
22 -
 23
23 -
 24
24 -
 25
25 -
 26
26 -
 27
27 -
 28
28 -
 29
29 -
 30
30 -
31
-
32
-
33
-
34
-
35
 |
 |
