Dell 1710n Owner's Manual - Page 58
Close the front cover., into place when correctly installed. - drum
 |
View all Dell 1710n manuals
Add to My Manuals
Save this manual to your list of manuals |
Page 58 highlights
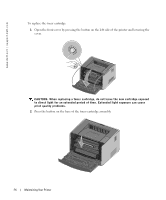
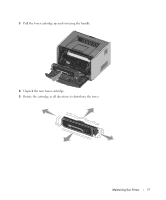
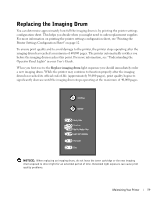
www.dell.com | support.dell.com 6 Install the new toner cartridge by aligning the white rollers on the toner cartridge with the white arrows on the tracks of the imaging drum and pushing the toner cartridge in as far as it will go. The cartridge clicks into place when correctly installed. 7 Close the front cover. 58 Maintaining Your Printer
-
 1
1 -
2
-
3
-
4
-
5
-
6
-
7
-
8
-
9
-
10
-
11
-
12
-
13
-
14
-
15
-
16
-
17
-
18
-
19
-
20
-
21
-
22
-
23
-
24
-
25
-
26
-
27
-
28
-
29
-
30
-
31
-
32
-
33
-
34
-
35
-
36
-
37
-
38
-
39
-
40
-
41
-
42
-
43
-
44
-
45
-
46
-
47
-
48
-
49
-
50
-
51
-
52
-
 53
53 -
 54
54 -
 55
55 -
 56
56 -
 57
57 -
 58
58 -
 59
59 -
 60
60 -
 61
61 -
 62
62 -
 63
63 -
64
-
65
-
66
-
67
-
68
-
69
-
70
-
71
-
72
-
73
-
74
-
75
-
76
-
77
-
78
-
79
-
80
-
81
-
82
-
83
-
84
-
85
-
86
-
87
-
88
-
89
-
90
-
91
-
92
-
93
-
94
-
95
-
96
-
97
-
98
-
99
-
100
-
101
-
102
-
103
-
104
-
105
-
106
-
107
-
108
 |
 |

58
Maintaining Your Printer
www.dell.com | support.dell.com
6
Install the new toner cartridge by aligning the white rollers on the toner cartridge with the
white arrows on the tracks of the imaging drum and pushing the toner cartridge in as far as
it will go. The cartridge
clicks
into place when correctly installed.
7
Close the front cover.