Dell 1710n Owner's Manual - Page 63
Troubleshooting
 |
View all Dell 1710n manuals
Add to My Manuals
Save this manual to your list of manuals |
Page 63 highlights
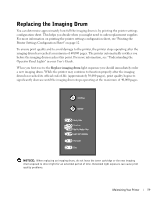
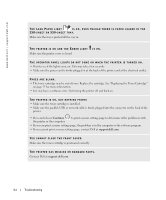
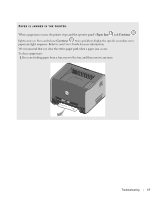
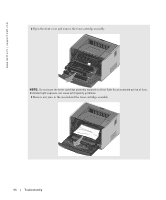
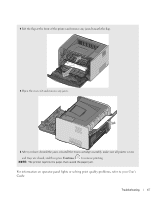
8 Troubleshooting Use the following table to find solutions for printing problems you encounter. If you cannot fix the problem, contact Dell at support.dell.com. You may have a printer part that requires cleaning or replacement by a service technician. T H E P R I N T I S G E T T I N G L I G H T , B U T T H E TO N E R LO W /REPLACE DRUM LIGHT IS NOT ON. Remove the toner cartridge and firmly shake it from side-to-side and front-to-back several to use the remaining toner, and then reinsert it and continue printing. Repeat this procedure multiple times until the print remains faded. When the print remains faded, replace the toner cartridge. See "Replacing the Toner Cartridge" on page 55 for more information. TH E TON ER LO W /REPLACE DRUM LIGHT IS ON (NOT BLINKING). Remove the toner cartridge and firmly shake it from side-to-side and front-to-back several to use the remaining toner, and then reinsert it and continue printing. Repeat this procedure multiple times until the print remains faded. When the print remains faded, replace the toner cartridge. See "Replacing the Toner Cartridge" on page 55 for more information. TH E TON ER LO W /REPLACE DRUM LIGHT IS BLINKING. The imaging drum is approaching full and will need replacing. Immediately order a new imaging drum and see "Replacing the Imaging Drum" on page 59 for more information. TH E TON ER LO W BLINKING. /REPLACE DRUM AND THE ERROR LIGHTS ARE The imaging drum is full and needs replacing. The printer will not print any more pages until the imaging drum is replaced. See "Replacing the Imaging Drum" on page 59 for more information. Troubleshooting 63
-
 1
1 -
2
-
3
-
4
-
5
-
6
-
7
-
8
-
9
-
10
-
11
-
12
-
13
-
14
-
15
-
16
-
17
-
18
-
19
-
20
-
21
-
22
-
23
-
24
-
25
-
26
-
27
-
28
-
29
-
30
-
31
-
32
-
33
-
34
-
35
-
36
-
37
-
38
-
39
-
40
-
41
-
42
-
43
-
44
-
45
-
46
-
47
-
48
-
49
-
50
-
51
-
52
-
53
-
54
-
55
-
56
-
57
-
 58
58 -
 59
59 -
 60
60 -
 61
61 -
 62
62 -
 63
63 -
 64
64 -
 65
65 -
 66
66 -
 67
67 -
 68
68 -
69
-
70
-
71
-
72
-
73
-
74
-
75
-
76
-
77
-
78
-
79
-
80
-
81
-
82
-
83
-
84
-
85
-
86
-
87
-
88
-
89
-
90
-
91
-
92
-
93
-
94
-
95
-
96
-
97
-
98
-
99
-
100
-
101
-
102
-
103
-
104
-
105
-
106
-
107
-
108
 |
 |
