Dell 5100cn Owner's Manual - Page 54
Installing the New Separator Roller, separator roller until it stops. Then
 |
UPC - 807027505897
View all Dell 5100cn manuals
Add to My Manuals
Save this manual to your list of manuals |
Page 54 highlights
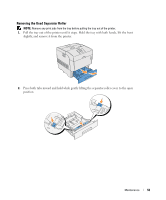
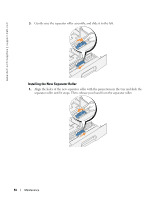
www.dell.com/supplies | support.dell.com 3. Gently raise the separator roller assembly, and slide it to the left. Installing the New Separator Roller 1. Align the holes of the new separator roller with the projections in the tray and slide the separator roller until it stops. Then, release your hand from the separator roller. 54 Maintenance
-
 1
1 -
2
-
3
-
4
-
5
-
6
-
7
-
8
-
9
-
10
-
11
-
12
-
13
-
14
-
15
-
16
-
17
-
18
-
19
-
20
-
21
-
22
-
23
-
24
-
25
-
26
-
27
-
28
-
29
-
30
-
31
-
32
-
33
-
34
-
35
-
36
-
37
-
38
-
39
-
40
-
41
-
42
-
43
-
44
-
45
-
46
-
47
-
48
-
 49
49 -
 50
50 -
 51
51 -
 52
52 -
 53
53 -
 54
54 -
 55
55 -
 56
56 -
 57
57 -
 58
58 -
 59
59 -
60
-
61
-
62
-
63
-
64
-
65
-
66
-
67
-
68
-
69
-
70
-
71
-
72
-
73
-
74
-
75
-
76
-
77
-
78
-
79
-
80
-
81
-
82
-
83
-
84
-
85
-
86
-
87
-
88
-
89
-
90
-
91
-
92
-
93
-
94
-
95
-
96
-
97
-
98
 |
 |

54
Maintenance
www.dell.com/supplies | support.dell.com
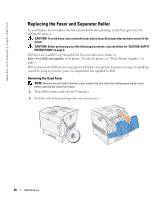
3.
Gently raise the separator roller assembly, and slide it to the left.
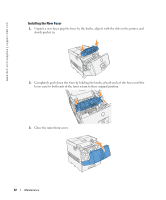
Installing the New Separator Roller
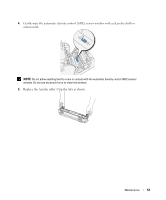
1.
Align the holes of the new separator roller with the projections in the tray and slide the
separator roller until it stops. Then, release your hand from the separator roller.