Dell 510D Service Manual - Page 14
Display Panel
 |
View all Dell 510D manuals
Add to My Manuals
Save this manual to your list of manuals |
Page 14 highlights
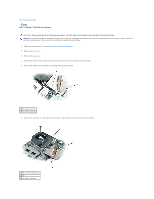
2. Remove the keyboard. 3. Remove the display assembly. 4. Use a plastic scribe to pry the five display bumpers out of the screw holes located on the front of the bezel. 5. Remove the six M2 x 5-mm screws located on the front of the bezel. 1 display bumper 4 M2 x 5-mm screws (6) 2 support bracket 5 display bumpers (4) 3 display panel 6 display bezel NOTICE: Carefully separate the bezel from the top cover to avoid damage to the bezel. 6. Starting at the edges of the bottom of the display panel, use your fingers to separate the bezel from the top cover by lifting the inside edge of the bezel away from the top cover. Display Panel CAUTION: Before performing the following procedures, read the safety instructions in your Product Information Guide. NOTICE: To prevent damage to components inside your computer, discharge static electricity from your body before you touch any of your computer's electronic components. You can do so by touching an unpainted metal surface. 1. Follow the instructions in "Preparing to Work Inside Your Computer." 2. Remove the keyboard. 3. Remove the display bezel. 4. Remove the eight M2 x 5-mm screws from the display panel.
-
 1
1 -
2
-
3
-
4
-
5
-
6
-
7
-
8
-
 9
9 -
 10
10 -
 11
11 -
 12
12 -
 13
13 -
 14
14 -
 15
15 -
 16
16 -
 17
17 -
 18
18 -
 19
19 -
20
-
21
-
22
-
23
-
24
-
25
-
26
-
27
-
28
-
29
-
30
-
31
-
32
-
33
-
34
-
35
-
36
-
37
-
38
-
39
-
40
-
41
-
42
 |
 |
