Dell 968 All In One Photo Printer User Guide - Page 51
Phone Book Menu, Auto Answer Schedule Menu, Edit Fax Settings Menu, Setup Menu, Name Search Menu,
 |
View all Dell 968 All In One Photo Printer manuals
Add to My Manuals
Save this manual to your list of manuals |
Page 51 highlights
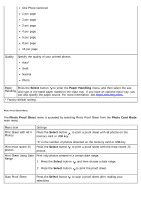
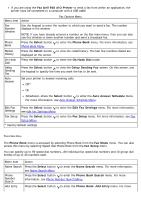
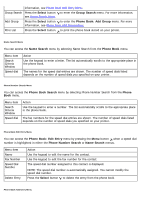
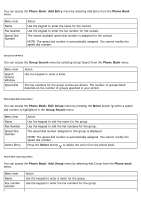
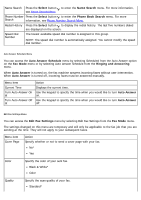
If you are using the Fax Dell 968 AIO Printer to send a fax from within an application, the printer must be connected to a computer with a USB cable. Menu item Action Fax Options Menu Fax Number Window Use the keypad to enter the number to which you want to send a fax. The number displays in the window. NOTE: If you have already entered a number on the Fax main menu, then you can also use this window to enter another number and send a broadcast fax. Phone Book Press the Select button to enter the Phone Book menu. For more information, see Phone Book Menu. Redial History Press the Select button to view the redial history. The last five numbers dialed are displayed on the screen. On Hook Press the Select button to enter the On Hook Dial mode. Dial Delay Sending Fax Press the Select button to view the Delay Sending Fax screen. On this screen, use the keypad to specify the time you want the fax to be sent. Auto Answer Set your printer to answer incoming calls. Off* On Scheduled-Press the Select button to enter the Auto Answer Schedule menu. For more information, see Auto Answer Schedule Menu. Edit Fax Settings Press the Select button to enter the Edit Fax Settings menu. For more information, see Edit Fax Settings Menu. Fax Setup Press the Select button to enter the Fax Setup menu. For more information, see Fax Setup Menu. * Factory default settings Phone Book Menu The Phone Book menu is accessed by selecting Phone Book from the Fax Mode menu. You can also access this menu by selecting Speed Dial Phone Book from the Fax Setup menu. You can specify up to 99 speed dial numbers-89 individual fax speed dial numbers and 10 group dial entries of up to 30 numbers each. Menu item Name Search Phone Number Search Add Entry Action Press the Select button to enter the Name Search menu. For more information, see Name Search Menu. Press the Select button to enter the Phone Book Search menu. For more information, see Phone Number Search Menu. Press the Select button to enter the Phone Book: Add Entry menu. For more
-
 1
1 -
2
-
3
-
4
-
5
-
6
-
7
-
8
-
9
-
10
-
11
-
12
-
13
-
14
-
15
-
16
-
17
-
18
-
19
-
20
-
21
-
22
-
23
-
24
-
25
-
26
-
27
-
28
-
29
-
30
-
31
-
32
-
33
-
34
-
35
-
36
-
37
-
38
-
39
-
40
-
41
-
42
-
43
-
44
-
45
-
 46
46 -
 47
47 -
 48
48 -
 49
49 -
 50
50 -
 51
51 -
 52
52 -
 53
53 -
 54
54 -
 55
55 -
 56
56 -
57
-
58
-
59
-
60
-
61
-
62
-
63
-
64
-
65
-
66
-
67
-
68
-
69
-
70
-
71
-
72
-
73
-
74
-
75
-
76
-
77
-
78
-
79
-
80
-
81
-
82
-
83
-
84
-
85
-
86
-
87
-
88
-
89
-
90
-
91
-
92
-
93
-
94
-
95
-
96
-
97
-
98
-
99
-
100
-
101
-
102
-
103
-
104
-
105
-
106
-
107
-
108
-
109
-
110
-
111
-
112
-
113
-
114
-
115
-
116
-
117
-
118
-
119
-
120
-
121
-
122
-
123
-
124
-
125
-
126
-
127
-
128
-
129
-
130
-
131
-
132
-
133
-
134
-
135
-
136
-
137
-
138
-
139
-
140
-
141
-
142
-
143
-
144
-
145
-
146
-
147
-
148
-
149
-
150
-
151
-
152
-
153
-
154
-
155
-
156
-
157
-
158
-
159
-
160
-
161
-
162
-
163
-
164
-
165
-
166
-
167
-
168
-
169
-
170
-
171
-
172
-
173
-
174
-
175
-
176
-
177
-
178
-
179
-
180
-
181
 |
 |