Dell A940 All In One Personal Printer UG_en-us - Page 6
Use the, When you want to, Lock the scanner. - checks
 |
View all Dell A940 All In One Personal Printer manuals
Add to My Manuals
Save this manual to your list of manuals |
Page 6 highlights
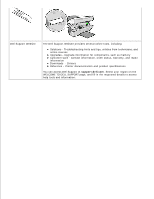
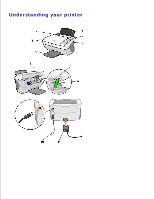
Use the: 1 Paper support 2 Display 3 Operator panel 4 Paper exit tray 5 Top cover 6 Paper guide 7 Printer (scanner unit) 8 Scanner lock 9 Scanner support 10 USB cable 11 Power supply When you want to: Load paper in the All-In-One. Check the status of the All-In-One. Operate your All-In-One (attached to a computer or unattached). Your operator panel has a FAX button. In order for the FAX button to function properly: Your computer must be connected to a data/fax modem. The data fax modem must be connected to an active analog phone line. The printer must be connected to the computer with a USB cable. NOTE: You cannot fax with a DSL (digital subscriber line) or cable modem. Stack paper as it exits the All-In-One. Place an item on or remove an item from the scanner glass. Make sure paper feeds correctly into the All-In-One. Change cartridges. Unlock the scanner. Lock the scanner. NOTE: Lift the scanner unit to do these things. Lock or unlock the scanner. NOTE: Unlock the scanner before use. Lock the scanner if you are moving your All-In-One. Keep the scanner unit open to change cartridges, unlock the scanner, or lock the scanner. Connect your All-In-One to a computer. Supply power to the All-In-One.
-
 1
1 -
 2
2 -
 3
3 -
 4
4 -
 5
5 -
 6
6 -
 7
7 -
 8
8 -
 9
9 -
 10
10 -
 11
11 -
 12
12 -
13
-
14
-
15
-
16
-
17
-
18
 |
 |