Dell Alienware X51 R2 Owner's Manual - Page 17
Flashing the BIOS - bios update
 |
View all Dell Alienware X51 R2 manuals
Add to My Manuals
Save this manual to your list of manuals |
Page 17 highlights
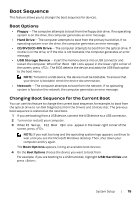
Flashing the BIOS The BIOS may require flashing when an update is available or when replacing the system board. To flash the BIOS: 1 Turn on the computer. 2 Go to dell.com/support/downloads. 3 Under the category Support for Home Users, click Drivers & Downloads Home. 4 Locate the Service Tag of your computer. The Service Tag for your computer is on a label at the back of your computer. For more information, see the Quick Start Guide that shipped with your computer. If you have your computer's Service Tag or Express Service Code: a Click Enter Service Tag. b Enter your computer's Service Tag or Express Service Code in the Service Tag or Express Service Code: field, click Submit, and proceed to step 5. If you do not have your computer's Service Tag, a Select one of the following options: - Automatically detect my Service Tag for me - Choose from My Products and Services List - Choose from a list of all Dell products b Click Continue and follow the instructions on the screen. 5 Select the Operating System installed in your computer. 6 A list of results appears on the screen. Click BIOS. 7 Click Download File to download the latest BIOS file. 8 In the Choose Download Method window, click Single-file download, and then click Continue. 9 In the Save As window, select an appropriate location to download the file on your computer. 10 If the Download Complete window appears, click Close. 11 Navigate to the folder where you downloaded the BIOS update file. The file icon appears in the folder and is titled the same as the downloaded BIOS update file. 12 Double-click the BIOS update file icon and follow the instructions on the screen. Flashing the BIOS | 17
-
 1
1 -
2
-
3
-
4
-
5
-
6
-
7
-
8
-
9
-
10
-
11
-
 12
12 -
 13
13 -
 14
14 -
 15
15 -
 16
16 -
 17
17 -
 18
18
 |
 |
