Dell Inspiron 1520 Service Manual - Page 64
Replacing the System Board Assembly - graphics card
 |
View all Dell Inspiron 1520 manuals
Add to My Manuals
Save this manual to your list of manuals |
Page 64 highlights
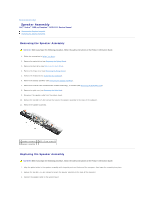
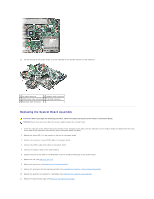
23. Lift the left side of the system board, and then carefully lift the system board out of the computer. 1 fan cable connector 2 speaker cable connector 3 sniffer/audio cable connector 4 CIR cable connector 5 Bluetooth cable connector Replacing the System Board Assembly CAUTION: Before you begin the following procedure, follow the safety instructions in the Product Information Guide. NOTICE: Ensure that any loose cables do not get caught beneath the system board. 1. Insert the right side of the system board into the base of the computer at an angle until the connectors on the system board are aligned with the holes on the base of the computer, then carefully lower the system board into place. 2. Replace the twelve M2.5 x 5-mm screws on the top of the system board. 3. Connect the consumer infrared (CIR) cable to the system board. 4. Connect the sniffer cable/audio cable to the system board. 5. Connect the speaker cable to the system board. 6. Connect one end of the cable for the Bluetooth card with wireless technology to the system board. 7. Replace the fan (see Replacing the Fan). 8. Replace the processor (see Replacing the Processor Module). 9. Replace the processor thermal-cooling assembly (see Replacing the Processor Thermal-Cooling Assembly). 10. Replace the graphics card assembly, if applicable (see Replacing the Graphics Card Assembly). 11. Replace the ExpressCard cage (see Replacing the ExpressCard Cage).
-
 1
1 -
2
-
3
-
4
-
5
-
6
-
7
-
8
-
9
-
10
-
11
-
12
-
13
-
14
-
15
-
16
-
17
-
18
-
19
-
20
-
21
-
22
-
23
-
24
-
25
-
26
-
27
-
28
-
29
-
30
-
31
-
32
-
33
-
34
-
35
-
36
-
37
-
38
-
39
-
40
-
41
-
42
-
43
-
44
-
45
-
46
-
47
-
48
-
49
-
50
-
51
-
52
-
53
-
54
-
55
-
56
-
57
-
58
-
 59
59 -
 60
60 -
 61
61 -
 62
62 -
 63
63 -
 64
64 -
 65
65 -
 66
66
 |
 |
