Dell Inspiron 300m Service Manual - Page 49
Continue lowering the Mini PCI card until it snaps into the inner tabs of the connector.
 |
View all Dell Inspiron 300m manuals
Add to My Manuals
Save this manual to your list of manuals |
Page 49 highlights
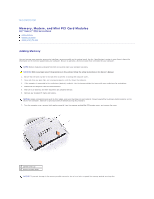
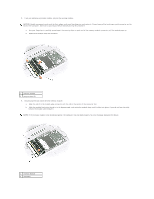
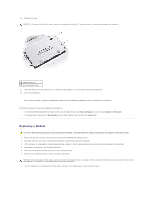
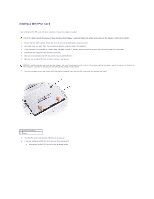
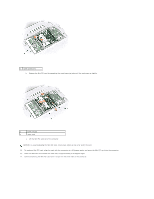
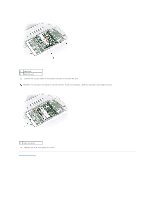
1 cable connectors b. Release the Mini PCI card by spreading the metal securing tabs until the card pops up slightly. 1 latch release 2 MPCI card c. Lift the Mini PCI card out of its connector. NOTICE: To avoid damaging the Mini PCI card, never place cables on top of or under the card. 10. To replace a Mini PCI card, align the card with the connector at a 45-degree angle, and press the Mini PCI card into the connector. 11. Lower the Mini PCI card toward the inner tabs to approximately a 20-degree angle. 12. Continue lowering the Mini PCI card until it snaps into the inner tabs of the connector.
-
 1
1 -
2
-
3
-
4
-
5
-
6
-
7
-
8
-
9
-
10
-
11
-
12
-
13
-
14
-
15
-
16
-
17
-
18
-
19
-
20
-
21
-
22
-
23
-
24
-
25
-
26
-
27
-
28
-
29
-
30
-
31
-
32
-
33
-
34
-
35
-
36
-
37
-
38
-
39
-
40
-
41
-
42
-
43
-
 44
44 -
 45
45 -
 46
46 -
 47
47 -
 48
48 -
 49
49 -
 50
50
 |
 |

b.
Release the Mini PCI card by spreading the metal securing tabs until the card pops up slightly.
c.
Lift the Mini PCI card out of its connector.
10.
To replace a Mini PCI card, align the card with the connector at a 45-degree angle, and press the Mini PCI card into the connector.
11.
Lower the Mini PCI card toward the inner tabs to approximately a 20-degree angle.
12.
Continue lowering the Mini PCI card until it snaps into the inner tabs of the connector.
1
cable connectors
1
latch release
2
MPCI card
NOTICE:
To avoid damaging the Mini PCI card, never place cables on top of or under the card.