Dell Latitude LS Fan Removal and Replacement - Page 10
assembly are aligned properly into the slotted holes in the palmrest
 |
View all Dell Latitude LS manuals
Add to My Manuals
Save this manual to your list of manuals |
Page 10 highlights
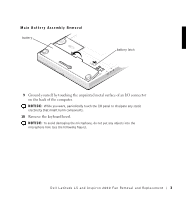
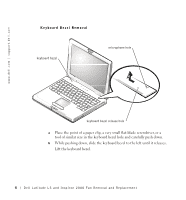
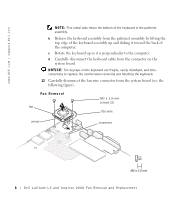
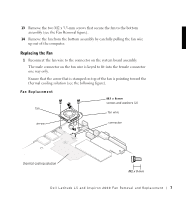
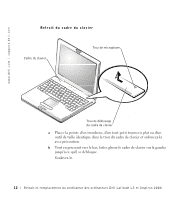
www.dell.com | support.dell.com 2 Place the fan in the bottom case, bending the fan wire so that it lays close to the outer edge of the fan. NOTICE: You must reinstall the new M2 x 8-mm screws and washers that shipped with the new fan. Otherwise, you could damage the hardware. Make sure that the screw is properly aligned with its corresponding hole, and avoid overtightening. 3 Reinstall the new M2 x 8-mm screws and washers to secure the fan to the bottom assembly. 4 Replace the keyboard assembly. a Connect the keyboard cable to the connector on the system board. NOTE: Five metal tabs retain the bottom of the keyboard in the palmrest assembly. b Fit the keyboard into place by sliding the five tabs on the bottom of the keyboard into the palmrest assembly. Ensure that the two tabs on the bottom right edge of the keyboard assembly are aligned properly into the slotted holes in the palmrest assembly. c Ensure that the top screw-hole tabs rest correctly in the screw slots on the palmrest assembly. d Verify that the keyboard is correctly installed. The keys should be flush with the left and right surfaces of the palmrest. e Reinstall the four M2 x 4-mm screws that secure the top of the keyboard assembly to the bottom assembly. 5 Reinstall the keyboard bezel. Perform the keyboard bezel removal procedure in reverse. 8 Dell Latitude LS and Inspiron 2000 Fan Removal and Replacement
-
 1
1 -
2
-
3
-
4
-
 5
5 -
 6
6 -
 7
7 -
 8
8 -
 9
9 -
 10
10 -
 11
11 -
 12
12 -
 13
13 -
 14
14 -
 15
15 -
16
-
17
-
18
-
19
-
20
-
21
-
22
-
23
-
24
-
25
-
26
-
27
-
28
-
29
-
30
-
31
-
32
-
33
-
34
-
35
-
36
 |
 |