Dell Latitude LS Fan Removal and Replacement - Page 9
Replacing the Fan, up out of the computer.
 |
View all Dell Latitude LS manuals
Add to My Manuals
Save this manual to your list of manuals |
Page 9 highlights
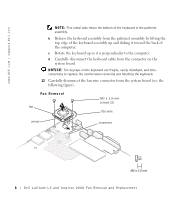
13 Remove the two M2 x 3.5-mm screws that secure the fan to the bottom assembly (see the Fan Removal figure). 14 Remove the fan from the bottom assembly by carefully pulling the fan wire up out of the computer. Replacing the Fan 1 Reconnect the fan wire to the connector on the system board assembly. The male connector on the fan wire is keyed to fit into the female connector one way only. Ensure that the arrow that is stamped on top of the fan is pointing toward the thermal cooling solution (see the following figure). Fan Replacement fan M2 x 8-mm screws and washers (2) fan wire arrow connector thermal cooling solution Dell Latitude LS and Inspiron 2000 Fan Removal and Replacement 7
-
 1
1 -
2
-
3
-
 4
4 -
 5
5 -
 6
6 -
 7
7 -
 8
8 -
 9
9 -
 10
10 -
 11
11 -
 12
12 -
 13
13 -
 14
14 -
15
-
16
-
17
-
18
-
19
-
20
-
21
-
22
-
23
-
24
-
25
-
26
-
27
-
28
-
29
-
30
-
31
-
32
-
33
-
34
-
35
-
36
 |
 |

Dell Latitude LS and Inspiron 2000 Fan Removal and Replacement
7
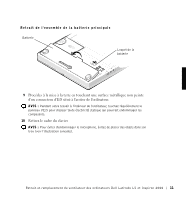
13
Remove the two M2 x 3.5-mm screws that secure the fan to the bottom
assembly (see the Fan Removal figure).
14
Remove the fan from the bottom assembly by carefully pulling the fan wire
up out of the computer.
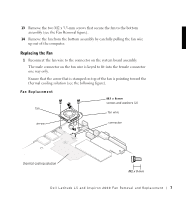
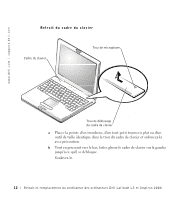
Replacing the Fan
1
Reconnect the fan wire to the connector on the system board assembly.
The male connector on the fan wire is keyed to fit into the female connector
one way only.
Ensure that the arrow that is stamped on top of the fan is pointing toward the
thermal cooling solution (see the following figure).
Fan Replacement
connector
fan
M2 x 8-mm
screws and
fan wire
arrow
thermal cooling solution
connector
fan
M2 x 8-mm
screws and washers (2)
fan wire
arrow
thermal cooling solution