Dell Latitude X200 System Information Guide - Page 27
Installing a Battery, Running the Dell Diagnostics - driver
 |
View all Dell Latitude X200 manuals
Add to My Manuals
Save this manual to your list of manuals |
Page 27 highlights
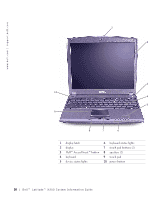
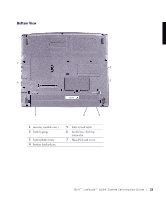
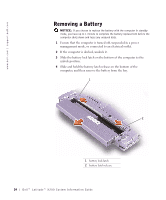
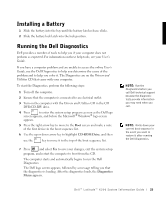
Installing a Battery 1 Slide the battery into the bay until the battery latch release clicks. 2 Slide the battery lock latch into the lock position. Running the Dell Diagnostics Dell provides a number of tools to help you if your computer does not perform as expected. For information on these help tools, see your User's Guide. If you have a computer problem and are unable to access the online User's Guide, use the Dell Diagnostics to help you determine the cause of the problem and to help you solve it. The Diagnostics are on the Drivers and Utilities CD that came with your computer. To start the Diagnostics, perform the following steps: 1 Turn off the computer. 2 Ensure that the computer is connected to an electrical outlet. 3 Turn on the computer with the Drivers and Utilities CD in the CD DVD/CD-RW drive. 4 Press to enter the system setup program as soon as the Dell logo screen appears, and before the Microsoft® Windows® logo screen appears. 5 Press the right arrow key to move to the Boot screen and make a note of the first device in the boot sequence list. 6 Use the up or down arrow key to highlight CD-ROM Drive, and then use the key to move it to the top of the boot sequence list. 7 Press and select Yes to save your changes, exit the system setup program, and restart the computer to boot from the CD. The computer starts and automatically begins to run the Dell Diagnostics. The Dell logo screen appears, followed by a message telling you that the diagnostics is loading. After the diagnostics loads, the Diagnostics Menu appears. NOTE: Run the Diagnostics before you call Dell technical support because the diagnostic tests provide information you may need when you call. NOTE: Write down your current boot sequence in the event you want to restore it after running the Dell Diagnostics. Dell™ Latitude™ X200 System Infor mation Guide 25
-
 1
1 -
2
-
3
-
4
-
5
-
6
-
7
-
8
-
9
-
10
-
11
-
12
-
13
-
14
-
15
-
16
-
17
-
18
-
19
-
20
-
21
-
 22
22 -
 23
23 -
 24
24 -
 25
25 -
 26
26 -
 27
27 -
 28
28 -
 29
29 -
 30
30 -
 31
31 -
 32
32 -
33
-
34
-
35
-
36
-
37
-
38
-
39
-
40
-
41
-
42
-
43
-
44
-
45
-
46
-
47
-
48
-
49
-
50
-
51
-
52
-
53
-
54
-
55
-
56
-
57
-
58
-
59
-
60
-
61
-
62
-
63
-
64
-
65
-
66
-
67
-
68
-
69
-
70
-
71
-
72
-
73
-
74
-
75
-
76
-
77
-
78
-
79
-
80
-
81
-
82
-
83
-
84
-
85
-
86
-
87
-
88
-
89
-
90
-
91
-
92
-
93
-
94
-
95
-
96
-
97
-
98
-
99
-
100
-
101
-
102
-
103
-
104
-
105
-
106
-
107
-
108
-
109
-
110
-
111
-
112
-
113
-
114
-
115
-
116
-
117
-
118
-
119
-
120
-
121
-
122
-
123
-
124
-
125
-
126
-
127
-
128
-
129
-
130
-
131
-
132
-
133
-
134
-
135
-
136
-
137
-
138
-
139
-
140
-
141
-
142
-
143
-
144
-
145
-
146
-
147
-
148
-
149
-
150
-
151
-
152
-
153
-
154
-
155
-
156
-
157
-
158
-
159
-
160
-
161
-
162
-
163
-
164
-
165
-
166
-
167
-
168
-
169
-
170
-
171
-
172
 |
 |
