Dell OptiPlex 5055 A Series Small Form Factor OptiPlex 5055 Small Form Factor - Page 59
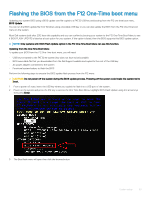
Flashing the BIOS from the F12 One-Time boot menu
 |
View all Dell OptiPlex 5055 A Series Small Form Factor manuals
Add to My Manuals
Save this manual to your list of manuals |
Page 59 highlights
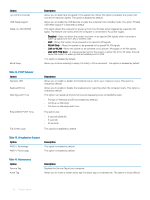
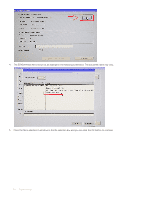
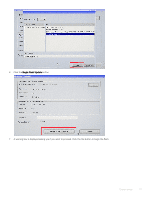
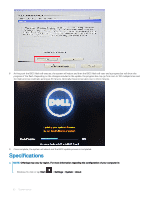
Flashing the BIOS from the F12 One-Time boot menu Updating your system BIOS using a BIOS update .exe file copied to a FAT32 USB key and booting from the F12 one time boot menu. BIOS Update You can run the BIOS update file from Windows using a bootable USB key or you can also update the BIOS from the F12 One-Time boot menu on the system. Most Dell systems built after 2012 have this capability and you can confirm by booting your system to the F12 One-Time Boot Menu to see if BIOS FLASH UPDATE is listed as a boot option for your system. If the option is listed, then the BIOS supports this BIOS update option. NOTE: Only systems with BIOS Flash Update option in the F12 One-Time Boot Menu can use this function. Updating from the One-Time Boot Menu To update your BIOS from the F12 One-Time boot menu, you will need: • USB key formatted to the FAT32 file system (key does not have to be bootable) • BIOS executable file that you downloaded from the Dell Support website and copied to the root of the USB key • AC power adapter connected to the system • Functional system battery to flash the BIOS Perform the following steps to execute the BIOS update flash process from the F12 menu: CAUTION: Do not power off the system during the BIOS update process. Powering off the system could make the system fail to boot. 1 From a power off state, insert the USB key where you copied the flash into a USB port of the system . 2 Power on the system and press the F12 key to access the One-Time Boot Menu, Highlight BIOS Flash Update using the arrow keys then press Enter. 3 The Bios flash menu will open then click the browse button. System setup 59
-
 1
1 -
2
-
3
-
4
-
5
-
6
-
7
-
8
-
9
-
10
-
11
-
12
-
13
-
14
-
15
-
16
-
17
-
18
-
19
-
20
-
21
-
22
-
23
-
24
-
25
-
26
-
27
-
28
-
29
-
30
-
31
-
32
-
33
-
34
-
35
-
36
-
37
-
38
-
39
-
40
-
41
-
42
-
43
-
44
-
45
-
46
-
47
-
48
-
49
-
50
-
51
-
52
-
53
-
 54
54 -
 55
55 -
 56
56 -
 57
57 -
 58
58 -
 59
59 -
 60
60 -
 61
61 -
 62
62 -
 63
63 -
 64
64 -
65
-
66
-
67
-
68
-
69
-
70
-
71
-
72
 |
 |