Dell OptiPlex G1 Dell OptiPlex G1 Mini Tower Managed PC Systems Reference and - Page 76
See Using the System Setup Program, for more information.
 |
View all Dell OptiPlex G1 manuals
Add to My Manuals
Save this manual to your list of manuals |
Page 76 highlights
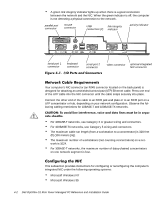
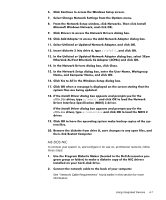
See your system administrator for information. To connect your system to, and configure it for use on, an Ethernet network, follow these steps: See "Network Cable Requirements" found earlier in this section for more information. See Chapter 2, "Using the System Setup Program," for more information. For information on administrative users and privileges, see your Windows NT documentation. The Network Settings window appears. The Select OEM Option dialog box appears. 4-4 Dell OptiPlex G1 Mini Tower Managed PC Reference and Installation Guide
-
 1
1 -
2
-
3
-
4
-
5
-
6
-
7
-
8
-
9
-
10
-
11
-
12
-
13
-
14
-
15
-
16
-
17
-
18
-
19
-
20
-
21
-
22
-
23
-
24
-
25
-
26
-
27
-
28
-
29
-
30
-
31
-
32
-
33
-
34
-
35
-
36
-
37
-
38
-
39
-
40
-
41
-
42
-
43
-
44
-
45
-
46
-
47
-
48
-
49
-
50
-
51
-
52
-
53
-
54
-
55
-
56
-
57
-
58
-
59
-
60
-
61
-
62
-
63
-
64
-
65
-
66
-
67
-
68
-
69
-
70
-
 71
71 -
 72
72 -
 73
73 -
 74
74 -
 75
75 -
 76
76 -
 77
77 -
 78
78 -
 79
79 -
 80
80 -
 81
81 -
82
-
83
-
84
-
85
-
86
-
87
-
88
-
89
-
90
-
91
-
92
-
93
-
94
-
95
-
96
-
97
-
98
-
99
-
100
-
101
-
102
-
103
-
104
-
105
-
106
-
107
-
108
-
109
-
110
-
111
-
112
-
113
-
114
-
115
-
116
-
117
-
118
-
119
-
120
-
121
-
122
-
123
-
124
-
125
-
126
-
127
-
128
-
129
-
130
-
131
-
132
-
133
-
134
-
135
-
136
-
137
-
138
-
139
-
140
-
141
-
142
-
143
-
144
-
145
-
146
-
147
-
148
-
149
-
150
-
151
-
152
-
153
-
154
-
155
-
156
-
157
-
158
-
159
-
160
-
161
-
162
-
163
-
164
 |
 |

4-4
Dell OptiPlex G1 Mini Tower Managed PC Reference and Installation Guide
¹¹· :KHQ²WKH²RSHUDWLQJ²V\VWHP²KDV²ILQLVKHG²FRS\LQJ²ILOHV²IURP²GLVNHWWH²º¶²
FOLFN²&ORVH²LQ²WKH²:LQGRZV²:HOFRPH²VFUHHQ²DQG²UHPRYH²WKH²GLVNHWWH²
IURP²GULYH²$·²7KHQ²FOLFN²&ORVH²LQ²WKH²1HWZRUN²ZLQGRZ·
¹º· :KHQ²SURPSWHG¶²HQWHU²LQIRUPDWLRQ²DERXW²\RXU²VSHFLILF²QHWZRUN·
See your system administrator for information.
¹»· &OLFN²<HV²LQ²WKH²1HWZRUN²6HWWLQJV²&KDQJH²ZLQGRZ²WR²UHVWDUW²\RXU²
V\VWHP·
:LQGRZV±17±¹·º
[
±1,&
To connect your system to, and configure it for use on, an Ethernet network, follow
these steps:
¹·
8VH²WKH²3URJUDP²’LVNHWWH²0DNHU²³ORFDWHG²LQ²WKH²’HOO²$FFHVVRULHV²SURµ
JUDP²JURXS´²WR²PDNH²D²GLVNHWWH²FRS\²RI²WKH²1,&²GULYHUV²LQVWDOOHG²RQ²
\RXU²KDUGµGLVN²GULYH·
º·
&RQQHFW²WKH²QHWZRUN²FDEOH²WR²WKH²EDFN²RI²\RXU²FRPSXWHU·
See “Network Cable Requirements” found earlier in this section for more
information.
»·
9HULI\²WKDW²WKH²1,&²LV²HQDEOHG²LQ²WKH²6\VWHP²6HWXS²SURJUDP·
See Chapter 2, “Using the System Setup Program,” for more information.
½·
6WDUW²:LQGRZV²17¶²DQG²ORJ²LQ²DV²XVHU²$GPLQLVWUDWRU²RU²DV²D²XVHU²ZLWK²
$GPLQLVWUDWRU²SULYLOHJHV·
For information on administrative users and privileges, see your Windows NT
documentation.
¸·
’RXEOHµFOLFN²WKH²3URJUDP²0DQDJHU¶²GRXEOHµFOLFN²WKH²0DLQ²JURXS¶²DQG²
WKHQ²GRXEOHµFOLFN²WKH²&RQWURO²3DQHO²LFRQ·
¾·
)URP²WKH²&RQWURO²3DQHO¶²GRXEOHµFOLFN²WKH²1HWZRUN²LFRQ·
The Network Settings window appears.
¿·
)URP²WKH²,QVWDOOHG²$GDSWHUV²JURXS¶²VHOHFW²WKH²H[LVWLQJ²»&RP²GULYHU²DQG²
FOLFN²5HPRYH·
À·
&OLFN²<HV²LQ²WKH²1HWZRUN²6HWWLQJV²GLDORJ²ER[·
Á·
&OLFN²$GG²$GDSWHU²LQ²WKH²1HWZRUN²6HWWLQJV²ZLQGRZ·²7KHQ²VFUROO²WR²
Ã2WKHU!²5HTXLUHV²’LVN²)URP²0DQXIDFWXUHU¶²DQG²FOLFN²&RQWLQXH·
¹Â· ,QVHUW²GLVNHWWH²¹²LQWR²GULYH²$¶²W\SH²
D²?
¶²DQG²WKHQ²FOLFN²2.·
The Select OEM Option dialog box appears.