Dell OptiPlex GX1p Dell OptiPlex GX1 and GX1p Mini Tower Managed PC Systems R - Page 122
See Installing an Expansion Card
 |
View all Dell OptiPlex GX1p manuals
Add to My Manuals
Save this manual to your list of manuals |
Page 122 highlights
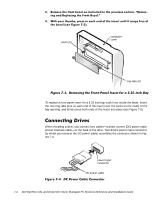
To further ensure proper positioning of the drive in the chassis, insert and tighten all four screws in the order in which the holes are numbered (the holes are marked "1" through "4"). Make sure that both bracket tabs snap into place in the drive bay. 5.25-inch drive See "Installing an Expansion Card" in Chapter 6. If your system came with an EIDE CD-ROM or tape drive, use the spare connector on the existing interface cable. Otherwise, use the EIDE interface cable provided in the drive kit. 7-8 Dell OptiPlex GX1 and GX1p Mini Tower Managed PC Systems Reference and Installation Guide
-
 1
1 -
2
-
3
-
4
-
5
-
6
-
7
-
8
-
9
-
10
-
11
-
12
-
13
-
14
-
15
-
16
-
17
-
18
-
19
-
20
-
21
-
22
-
23
-
24
-
25
-
26
-
27
-
28
-
29
-
30
-
31
-
32
-
33
-
34
-
35
-
36
-
37
-
38
-
39
-
40
-
41
-
42
-
43
-
44
-
45
-
46
-
47
-
48
-
49
-
50
-
51
-
52
-
53
-
54
-
55
-
56
-
57
-
58
-
59
-
60
-
61
-
62
-
63
-
64
-
65
-
66
-
67
-
68
-
69
-
70
-
71
-
72
-
73
-
74
-
75
-
76
-
77
-
78
-
79
-
80
-
81
-
82
-
83
-
84
-
85
-
86
-
87
-
88
-
89
-
90
-
91
-
92
-
93
-
94
-
95
-
96
-
97
-
98
-
99
-
100
-
101
-
102
-
103
-
104
-
105
-
106
-
107
-
108
-
109
-
110
-
111
-
112
-
113
-
114
-
115
-
116
-
 117
117 -
 118
118 -
 119
119 -
 120
120 -
 121
121 -
 122
122 -
 123
123 -
 124
124 -
 125
125 -
 126
126 -
 127
127 -
128
-
129
-
130
-
131
-
132
-
133
-
134
-
135
-
136
-
137
-
138
-
139
-
140
-
141
-
142
-
143
-
144
-
145
-
146
-
147
-
148
-
149
-
150
-
151
-
152
-
153
-
154
-
155
-
156
-
157
-
158
-
159
-
160
-
161
-
162
-
163
-
164
-
165
-
166
-
167
-
168
-
169
-
170
-
171
-
172
-
173
-
174
 |
 |

7-8
Dell OptiPlex GX1 and GX1p Mini Tower Managed PC Systems Reference and Installation Guide
To further ensure proper positioning of the drive in the chassis, insert and tighten
all four screws
in the order in which the holes are numbered
(the holes are
marked “1” through “4”).
¸·
6OLGH²WKH²QHZ²GULYH²LQWR²WKH²GULYH²ED\²XQWLO²LW²VQDSV²VHFXUHO\²LQWR²SODFH²
³VHH²)LJXUH²ÀµÁ´·
Make sure that both bracket tabs snap into place in the drive bay.
)LJXUH±¼¶Áµ±±,QVHUWLQJ±WKH±1HZ±’ULYH±,QWR±WKH±’ULYH±%D\
À·
,I²\RX²DUH²LQVWDOOLQJ²D²GULYH²WKDW²KDV²LWV²RZQ²FRQWUROOHU²FDUG¶²LQVWDOO²WKH²
FRQWUROOHU²FDUG²LQ²DQ²H[SDQVLRQ²VORW·
See “Installing an Expansion Card” in Chapter 6.
Á·
&RQQHFW²D²’&²SRZHU²FDEOH²WR²WKH²SRZHU²LQSXW²FRQQHFWRU²RQ²WKH²EDFN²RI²
WKH²GULYH²³VHH²)LJXUH ÀµÂ´·
&$87,21±²<RX²PXVW²PDWFK²WKH²FRORUHG²VWULS²RQ²WKH²FDEOH²ZLWK²SLQ²º²RQ²WKH²
GULYH•V²LQWHUIDFH²FRQQHFWRU²WR²DYRLG²SRVVLEOH²GDPDJH²WR²\RXU²V\VWHP·
·
&RQQHFW²WKH²DSSURSULDWH²LQWHUIDFH²FDEOH²WR²WKH²LQWHUIDFH²FRQQHFWRU²RQ²
WKH²EDFN²RI²WKH²GULYH²³VHH²)LJXUH²ÀµÂ´·
If your system came with an EIDE CD-ROM or tape drive, use the spare connec-
tor on the existing interface cable. Otherwise, use the EIDE interface cable
provided in the drive kit.
5.25-inch drive