Dell OptiPlex XE2 Owner's Manual - Mini Tower - Page 9
Installing the Wireless Local Area Network (WLAN) Card, Removing the Front Bezel
 |
View all Dell OptiPlex XE2 manuals
Add to My Manuals
Save this manual to your list of manuals |
Page 9 highlights
5. Press the blue tab and lift the latch outwards and remove the WLAN card from the connector on the system board. Installing the Wireless Local Area Network (WLAN) Card 1. Insert the WLAN card into the connector on the system board and press down until it is secured. 2. Affix the latch. 3. Place the antenna puck on the connector and tighten the screws to secure it to the computer. 4. Install the cover. 5. Follow the procedures in After Working Inside Your Computer. Removing the Front Bezel 1. Follow the procedures in Before Working Inside Your Computer. 2. Remove the cover. 3. Pry the front bezel retention clips away from the chassis located at the edge of front bezel. 9
-
 1
1 -
2
-
3
-
 4
4 -
 5
5 -
 6
6 -
 7
7 -
 8
8 -
 9
9 -
 10
10 -
 11
11 -
 12
12 -
 13
13 -
 14
14 -
15
-
16
-
17
-
18
-
19
-
20
-
21
-
22
-
23
-
24
-
25
-
26
-
27
-
28
-
29
-
30
-
31
-
32
-
33
-
34
-
35
-
36
-
37
-
38
-
39
-
40
-
41
-
42
-
43
-
44
-
45
-
46
-
47
-
48
-
49
-
50
-
51
-
52
-
53
-
54
-
55
-
56
-
57
-
58
-
59
 |
 |

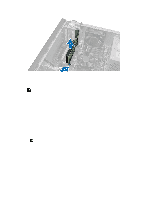
5.
Press the blue tab and lift the latch outwards and remove the WLAN card from the connector on the system board.
Installing the Wireless Local Area Network (WLAN) Card
1.
Insert the WLAN card into the connector on the system board and press down until it is secured.
2.
Affix the latch.
3.
Place the antenna puck on the connector and tighten the screws to secure it to the computer.
4.
Install the cover.
5.
Follow the procedures in
After Working Inside Your Computer
.
Removing the Front Bezel
1.
Follow the procedures in
Before Working Inside Your Computer
.
2.
Remove the cover.
3.
Pry the front bezel retention clips away from the chassis located at the edge of front bezel.
9