Dell PowerApp 220 Microprocessor Upgrade Installation Guide - Page 4
Installation and Troubleshooting Guide, Unpack the new microprocessor.
 |
View all Dell PowerApp 220 manuals
Add to My Manuals
Save this manual to your list of manuals |
Page 4 highlights
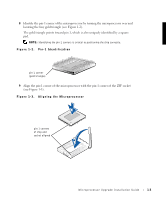
www.dell.com | support.dell.com NOTICE: Never remove the heat sink from a microprocessor unless you intend to remove the microprocessor. The heat sink is necessary to maintain proper thermal conditions. CAUTION: The microprocessor chip and heat sink can become extremely hot. Be sure that the microprocessor has had sufficient time to cool before handling. 4 Remove the heat sink. NOTICE: Be careful not to bend any of the pins when removing the microprocessor chip. Bending the pins can permanently damage the microprocessor chip. 5 Swing the socket release lever to the upright position (see Figure 1-1). The microprocessor is now unlocked from the socket. 6 Lift the microprocessor out of the socket and leave the release lever up so that the socket is ready for the new microprocessor. Figure 1-1. Removing the Microprocessor microprocessor chip release lever microprocessor socket CAUTION: Be careful not to bend any of the pins when unpacking the microprocessor chip. Bending the pins can permanently damage the microprocessor chip. 7 Unpack the new microprocessor. If any of the pins on the microprocessor appear bent, see "Getting Help" in your system Installation and Troubleshooting Guide for instructions on obtaining technical assistance from Dell. 1-2 Microprocessor Upgrade Installation Guide
-
 1
1 -
 2
2 -
 3
3 -
 4
4 -
 5
5 -
 6
6 -
 7
7 -
 8
8
 |
 |
