Dell PowerConnect W-AP124 Dell PowerConnect W-AP120 Series AP Installation Gui - Page 4
Installing the AP
 |
View all Dell PowerConnect W-AP124 manuals
Add to My Manuals
Save this manual to your list of manuals |
Page 4 highlights
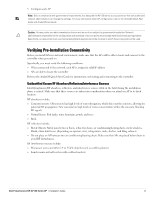
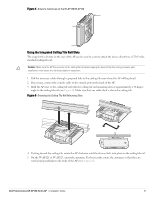
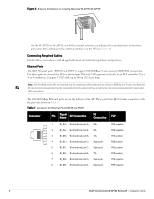
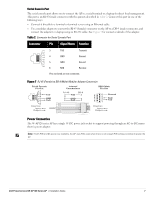
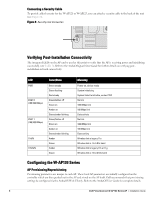
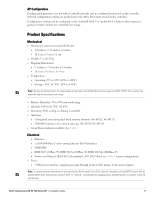
Installing the AP Caution: Installation and service of Dell Networks products should be performed by Professional Installers. Additional antenna and transmit power information for Professional Installers can be found at https://support.dell.com. Using the Integrated Wall-Mounting Slots The keyhole-shaped slots on the back of the AP can be used to attach the device upright to an indoor wall or shelf. When you choose the mounting location, allow additional space at the right of the unit for cables. Note: For product dimensions, see Product Specifications in this guide. Allow 2 inches (5 cm) of additional space at the right side of the installed unit for cables, and make sure enough space is available for antenna articulation. 1. At the mounting location, install two screw on the wall or shelf, 1 7/8 inches (4.7 cm) apart. If you are attaching the device to drywall, Dell recommends using appropriate wall anchors (not included). 2. Align the mounting slots on the rear of the AP over the screws and slide the unit into place (see Figure 2). Figure 2 Installing the W-AP120 Series Access Point on a Wall 3. On the W-AP121 or W-AP125, orient the antennas. For best performance, swivel the antennas so that they are oriented vertically, preferably in the same plane, parallel to the wall (see Figure 3). Figure 3 Antenna Orientation on a Wall-Mounted W-AP121/W-AP125 On the W-AP120 or W-AP124, install the external antennas according to the manufacturer's instructions, and connect the antennas to the antenna interfaces on the AP (see Figure 4). 4 Dell PowerConnect W-AP120 Series AP | Installation Guide
-
 1
1 -
 2
2 -
 3
3 -
 4
4 -
 5
5 -
 6
6 -
 7
7 -
 8
8 -
 9
9 -
 10
10 -
11
-
12
 |
 |