Dell PowerConnect W-AP124 Dell PowerConnect W-AP120 Series AP Installation Gui - Page 5
Using the Integrated Ceiling Tile Rail Slots
 |
View all Dell PowerConnect W-AP124 manuals
Add to My Manuals
Save this manual to your list of manuals |
Page 5 highlights
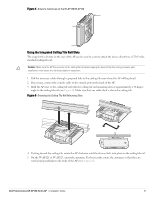
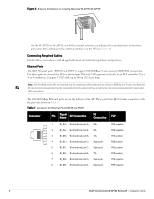
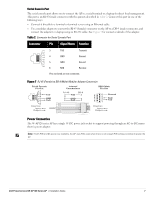
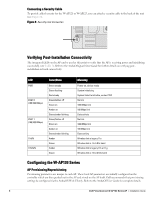
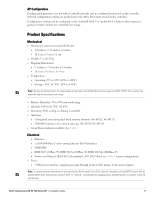
Figure 4 Antenna Interfaces on the W-AP120/W-AP124 ap Using the Integrated Ceiling Tile Rail Slots The snap-in tile rail slots on the rear of the AP can be used to securely attach the device directly to a 15/16" wide, standard ceiling tile rail. Caution: Make sure the AP fits securely on the ceiling tile rail when hanging the device from the ceiling, because poor installation could cause it to fall onto people or equipment. 1. Pull the necessary cables through a prepared hole in the ceiling tile near where the AP will be placed. 2. If necessary, connect the console cable to the console port on the back of the AP. 3. Hold the AP next to the ceiling tile rail with the ceiling tile rail mounting slots at approximately a 30-degree angle to the ceiling tile rail (see Figure 5). Make sure that any cable slack is above the ceiling tile. Figure 5 Orienting the Ceiling Tile Rail Mounting Slots ap1 4. Pushing toward the ceiling tile, rotate the AP clockwise until the device clicks into place on the ceiling tile rail. 5. On the W-AP121 or W-AP125, orient the antennas. For best results, rotate the antennas so that they are vertical (perpendicular to the body of the AP) (see Figure 6). Dell PowerConnect W-AP120 Series AP | Installation Guide 5
-
 1
1 -
 2
2 -
 3
3 -
 4
4 -
 5
5 -
 6
6 -
 7
7 -
 8
8 -
 9
9 -
 10
10 -
 11
11 -
12
 |
 |
