Dell PowerEdge 2400 Activating the Dell PERC2 - Page 3
To activate the integrated PowerEdge Expandable RAID Controller PERC 2/Si - memory
 |
View all Dell PowerEdge 2400 manuals
Add to My Manuals
Save this manual to your list of manuals |
Page 3 highlights
To activate the integrated PowerEdge Expandable RAID Controller (PERC) 2/Si, perform the following steps. 1. Turn off and unplug your computer and peripherals. 2. Remove the right-side computer cover. See "Checking Inside the Computer" in your system Installation and Troubleshooting Guide for more information. 3. Remove the cooling shroud. See "Checking Inside the Computer" in your system Installation and Troubleshooting Guide for more information. 4. Press the ejectors on the RAID controller DIMM socket (see Figure 1-1) down and outward to allow the dual in-line memory module (DIMM) to be inserted into the socket (see Figure 1-2). Dell PowerEdge 2400 Systems-Activating the Dell PowerEdge Expandable RAID Controller 2/Si 1-1
-
 1
1 -
 2
2 -
 3
3 -
 4
4 -
 5
5 -
 6
6 -
 7
7 -
 8
8
 |
 |
Dell PowerEdge 2400 Systems—Activating the Dell PowerEdge Expandable RAID Controller 2/Si
1-1
±²³³´µ¶·¸²¹º»¼²´µ½¾¿¿
ÀÁÂòĵŵÆÇÃÈÉÊÃÈ˼µÃ̲µ
±²³³ ¶·¸²¹º»¼²µºÍÎÊË»Êϳ²µ
°Æ!± "·Ëù·³³²¹µ½#ÀÈ
To activate the integrated PowerEdge Expandable RAID Controller (PERC) 2/Si,
perform the following steps.
±²³´µ¶·¸³¹¸º»¼½¼¾¿¸ÀÁÂÁü¸¿¹¸Ä¹Å»¸Æ¹ÂºÅ¿¼»¸ÇÄÇ¿¼ÂȸǼ¼¸ÉÊ»¹¿¼Æ¿Ë¾Ã¸
ÌÃÁ˾ǿ¸¶Í¼Æ¿»¹Ç¿Á¿ËƸÎËÇÆÏÁ»Ã¼°¸Ë¾¸Ä¹Å»¸ÇÄÇ¿¼Â¸
±²³´µ²¶·¸¹º³
!
±²³´µ¶·¸"¹Å¸#ËÍ͸͹Ǽ¸¼$Ëǿ˾øÀÁ¿Á¸¹¾¸ÏÁ»À%ÀËÇ&¸À»Ë½¼Ç¸Á¿¿ÁÆϼÀ¸¿¹¸¿Ï¼¸
˾¿¼Ã»Á¿¼À¸ÌÀÁº¿¼Æ¸'()*¸ÇÂÁÍ͸ƹºſ¼»¸ÇÄÇ¿¼Â¸Ë¾¿¼»+ÁƼ¸,-µ-´.¸Æ¹¾¿»¹Íͼ»¸
Á+¿¼»¸Ä¹Å¸Áƿ˽Á¿¼¸¿Ï¼¸Ë¾¿¼Ã»Á¿¼À¸Ê¶/µ¸01-˸ƹ¾¿»¹Íͼ»¸Á¾À¸Æ¹¾+ËÃÅ»¼¸¿Ï¼¸
ÏÁ»À%ÀËÇ&¸À»Ë½¼Ç¸ÁǸ»¼ÀžÀÁ¾¿¸Á»»ÁÄǸ¹+¸Ë¾À¼º¼¾À¼¾¿¸ÀËÇ&Ǹ,/Ì´Î.!
³¹¸Á½¹ËÀ¸ÀÁ¿Á¸Í¹ÇÇȸ2ÁÆ&¸Åº¸ÁÍ͸ÀÁ¿Á¸¹¾¸¿Ï¼¸ÏÁ»À%ÀËÇ&¸À»Ë½¼Ç¸2¼+¹»¼¸Áƿ˽Á¿%
˾ø¿Ï¼¸Ë¾¿¼Ã»Á¿¼À¸Ê¶/µ¸01-˸ƹ¾¿»¹Íͼ»!
µÌ3³´²±·¸³¹¸º»¼½¼¾¿¸2¹ÀËÍĸ˾4Å»Äȸ2¼+¹»¼¸Ä¹Å¸Áƿ˽Á¿¼¸¿Ï¼¸Ë¾¿¼Ã»Á¿¼À¸
ʶ/µ 01-˸ƹ¾¿»¹Íͼ»È¸Ä¹Å¸ÂÅÇ¿¸¿Å»¾¸¹++¸¿Ï¼¸Æ¹ÂºÅ¿¼»¸Á¾À¸ÀËÇƹ¾¾¼Æ¿¸Ë¿¸+»¹Â¸
˿Ǹ̵¸º¹#¼»¸Ç¹Å»Æ¼!¸5¹»¸Â¹»¼¸Ë¾+¹»ÂÁ¿Ë¹¾È¸Ç¼¼¸É-Á+¼¿Ä¸5˻ǿ65¹»¸"¹Å¸Á¾À¸
"¹Å»¸µ¹ÂºÅ¿¼»°¸Ë¾¸Ä¹Å»¸ÇÄÇ¿¼Â¸
±²³´µ²¶·¸¹º³
!
1.
Turn off and unplug your computer and peripherals.
2.
Remove the right-side computer cover.
See “Checking Inside the Computer” in your system
Installation and Trouble-
shooting Guide
for more information.
3.
Remove the cooling shroud.
See “Checking Inside the Computer” in your system
Installation and Trouble-
shooting Guide
for more information.
4.
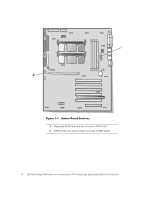
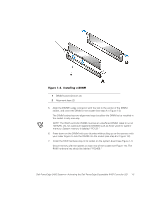
Press the ejectors on the RAID controller DIMM socket (see Figure 1-1) down
and outward to allow the dual in-line memory module (DIMM) to be inserted into
the socket (see Figure 1-2).