Dell PowerEdge 2450 Installation and Troubleshooting Guide (.pdf) - Page 6
Installing the System in the Rack, - weight
 |
View all Dell PowerEdge 2450 manuals
Add to My Manuals
Save this manual to your list of manuals |
Page 6 highlights
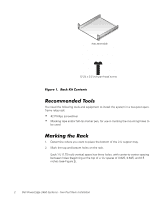
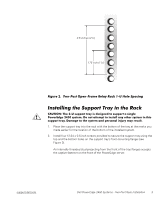
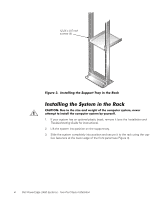
(Rev. 11/3/98) FILE LOCATION: C:\Dell\docs\2450\2post\81HFFts0.fm 12-24 x 0.5 inch screws (4) Figure 3. Installing the Support Tray in the Rack Installing the System in the Rack CAUTION: Due to the size and weight of the computer system, never attempt to install the computer system by yourself. 1. If your system has an optional plastic bezel, remove it (see the Installation and Troubleshooting Guide for instructions). 2. Lift the system into position on the support tray. 3. Slide the system completely into position and secure it to the rack using the cap- tive fasteners at the lower edge of the front panel (see Figure 4). DELL CONFIDENTIAL - Preliminary 9/27/01 4 Dell PowerEdge 2450 Systems - Two-Post Rack Installation
-
 1
1 -
 2
2 -
 3
3 -
 4
4 -
 5
5 -
 6
6 -
 7
7 -
 8
8
 |
 |

4
Dell PowerEdge 2450 Systems - Two-Post Rack Installation
DELL CONFIDENTIAL - Preliminary
9/27/01
(Rev. 11/3/98) FILE LOCATION:
C:\Dell\docs\2450\2post\81HFFts0.fm
Figure 3.
Installing the Support Tray in the Rack
Installing the System in the Rack
CAUTION: Due to the size and weight of the computer system, never
attempt to install the computer system by yourself.
1.
If your system has an optional plastic bezel, remove it (see the
Installation and
Troubleshooting Guide
for instructions).
2.
Lift the system into position on the support tray.
3.
Slide the system completely into position and secure it to the rack using the cap-
tive fasteners at the lower edge of the front panel (see Figure 4).
12-24 x 0.5 inch
screws (4)