Dell PowerEdge 2850 Processor Upgrade Installation Guide
Dell PowerEdge 2850 Manual
 |
View all Dell PowerEdge 2850 manuals
Add to My Manuals
Save this manual to your list of manuals |
Dell PowerEdge 2850 manual content summary:
- Dell PowerEdge 2850 | Processor Upgrade Installation
Guide - Page 1
Dell™ PowerEdge™ Systems Processor Upgrade Installation Guide Guide d'installation pour la mise à niveau du processeur Anleitung zum Prozessor-Upgrade Guía de instalación para actualización de procesadores www.dell.com | support.dell.com - Dell PowerEdge 2850 | Processor Upgrade Installation Guide - Page 2
- Dell PowerEdge 2850 | Processor Upgrade Installation
Guide - Page 3
Dell™ PowerEdge™ Systems Processor Upgrade Installation Guide www.dell.com | support.dell.com - Dell PowerEdge 2850 | Processor Upgrade Installation
Guide - Page 4
to hardware or loss of data and tells you how to avoid the problem. CAUTION: A CAUTION indicates a potential for property damage, personal injury, or permission of Dell Inc. is strictly forbidden. Trademarks used in this text: Dell, the DELL logo and PowerEdge are trademarks of Dell Inc.; Intel - Dell PowerEdge 2850 | Processor Upgrade Installation
Guide - Page 5
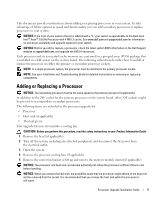
Before you add or replace a processor, check the latest system BIOS information on the Dell Support website at support.dell.com, and upgrade the BIOS if necessary. Each processor and its associated cache memory are contained in a pin-grid array (PGA) package that is installed in a ZIF socket on the - Dell PowerEdge 2850 | Processor Upgrade Installation
Guide - Page 6
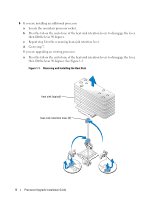
existing processor: a Press the tab on the end of one of the heat-sink retention levers to disengage the lever, then lift the lever 90 degrees. See Figure 1-1. Figure 1-1. Removing and Installing the Heat Sink heat sink (typical) heat-sink retention lever (2) 4 Processor Upgrade Installation Guide - Dell PowerEdge 2850 | Processor Upgrade Installation
Guide - Page 7
up so that the socket is ready for the new processor. 7 Unpack the new processor. If any of the pins on the microprocessor appear bent, see "Getting Help" in your Installation and Troubleshooting Guide for instructions about obtaining technical assistance. Processor Upgrade Installation Guide 5 - Dell PowerEdge 2850 | Processor Upgrade Installation
Guide - Page 8
seated in the socket, rotate the socket release lever back down until it snaps into place, securing the processor. 10 Install the heat sink. a If you are upgrading an existing processor, use a clean lint-free cloth to remove the existing grease from the heat sink. NOTE: Use the heat sink that you - Dell PowerEdge 2850 | Processor Upgrade Installation
Guide - Page 9
system diagnostics to verify that the new processor operates correctly. See "Running the System Diagnostics" in your Installation and Troubleshooting Guide for information about running the diagnostics and troubleshooting processor problems. 18 Replace the bezel (if applicable). Processor Upgrade - Dell PowerEdge 2850 | Processor Upgrade Installation
Guide - Page 10
8 Processor Upgrade Installation Guide - Dell PowerEdge 2850 | Processor Upgrade Installation
Guide - Page 11
Dell™ PowerEdge™ 系统 www.dell.com | support.dell.com - Dell PowerEdge 2850 | Processor Upgrade Installation
Guide - Page 12
2004-2007 Dell Inc Dell Inc Dell、 DELL 徽标和 PowerEdge 是 Dell Inc Intel 和 Xeon 是 Intel Corporation Dell Inc 2007 年 5 月 P/N F6587 Rev. A01 - Dell PowerEdge 2850 | Processor Upgrade Installation
Guide - Page 13
II 4 MB Intel® Xeon® 2.8 GHz www.dell.com 和 support.dell.com Dell 支持 Web 站点 support.dell.com BIOS BIOS PGA ZIF ZIF ZIF 1 2 3 4 5 11 - Dell PowerEdge 2850 | Processor Upgrade Installation
Guide - Page 14
6 a b 90 度。 c b。 d 7 a 90 1-1。 图 1-1 2) 12 - Dell PowerEdge 2850 | Processor Upgrade Installation
Guide - Page 15
b 等待 30 c d e f 1-2。 图 1-2 1 处理器 1 ZIF 插槽 g 7 13 - Dell PowerEdge 2850 | Processor Upgrade Installation
Guide - Page 16
8 1 ZIF 插槽的 1 1-2 1 1 ZIF 9 a b 1 ZIF c 10 a 6 b c 1-1。 d 1-1。 e 11 12 13 14 15 16 按 - Dell PowerEdge 2850 | Processor Upgrade Installation
Guide - Page 17
Systèmes Dell™ PowerEdge™ Guide d'installation pour la mise à niveau du processeur www.dell.com | support.dell.com - Dell PowerEdge 2850 | Processor Upgrade Installation
Guide - Page 18
La reproduction de ce document de quelque manière que ce soit sans l'autorisation écrite de Dell Inc. est strictement interdite. Marques utilisées dans ce document : Dell, le logo DELL et PowerEdge sont des marques de Dell Inc. ; Intel et Xeon sont des marques déposées de Intel Corporation. Tous les - Dell PowerEdge 2850 | Processor Upgrade Installation
Guide - Page 19
: Sur les systèmes monoprocesseur, le processeur doit être installé dans le support principal. REMARQUE : Consultez le document Installation and Troubleshooting Guide (Guide d'installation et de dépannage) pour obtenir des instructions détaillées sur le retrait ou le remplacement de composants - Dell PowerEdge 2850 | Processor Upgrade Installation
Guide - Page 20
, il est possible que le processeur reste collé et sorte de son support. Il est donc recommandé de retirer le dissipateur de chaleur quand le Figure 1-1. Retrait et installation du dissipateur de chaleur Dissipateur de chaleur (standard) Levier de fixation (2) 18 Guide d'installation pour la mise - Dell PowerEdge 2850 | Processor Upgrade Installation
Guide - Page 21
support et laissez le levier relevé afin de pouvoir installer le nouveau processeur. 7 Déballez le nouveau processeur. Si des broches du microprocesseur semblent tordues, consultez la section "Getting Help" (Obtention d'aide) du document Installation and Troubleshooting Guide (Guide d'installation - Dell PowerEdge 2850 | Processor Upgrade Installation
Guide - Page 22
est parfaitement positionné dans le support, abaissez le levier d'éjection jusqu'à ce qu'il s'enclenche et verrouille le processeur dans le support. 10 Installez le dissipateur de chaleur 1-1. e Verrouillez l'autre levier de fixation. 20 Guide d'installation pour la mise à niveau du processeur - Dell PowerEdge 2850 | Processor Upgrade Installation
Guide - Page 23
processeur, reportez-vous à la section "Running the System Diagnostics" (Exécution des diagnostics du système) du document Installation and Troubleshooting Guide (Guide d'installation et de dépannage). 18 Réinstallez le cadre, le cas échéant. Guide d'installation pour la mise à niveau du processeur - Dell PowerEdge 2850 | Processor Upgrade Installation
Guide - Page 24
22 Guide d'installation pour la mise à niveau du processeur - Dell PowerEdge 2850 | Processor Upgrade Installation
Guide - Page 25
Dell™ PowerEdge™-Systeme Anleitung zum Prozessor-Upgrade www.dell.com | support.dell.com - Dell PowerEdge 2850 | Processor Upgrade Installation
Guide - Page 26
digungen der Hardware oder vor Datenverlust und zeigt auf, wie derartige Probleme vermieden werden können. VORSICHT: Hiermit werden Sie auf eine potentiell von Dell Inc. sind strengstens untersagt. In diesem Text verwendete Marken: Dell, das DELL Logo und PowerEdge sind Marken von Dell Inc.; - Dell PowerEdge 2850 | Processor Upgrade Installation
Guide - Page 27
ühren. Informationen zur Verfügbarkeit der Prozessoren und Upgrade-Optionen für Ihr System erhalten Sie unter www.dell.com und support.dell.com. HINWEIS: Überprüfen Sie die neuesten BIOS-Systeminformationen auf der Dell Support-Webseite unter support.dell.com, und führen Sie, falls erforderlich, ein - Dell PowerEdge 2850 | Processor Upgrade Installation
Guide - Page 28
Sie den sekundären Prozessorsockel ausfindig. b Drücken Sie auf die Taste am Ende eines der Kühlkörper-Haltehebel, um die Verriegelung zu lösen, und drehen ersetzen, verfahren Sie wie folgt: a Drücken Sie auf die Taste am Ende eines der Kühlkörper-Haltehebel, um die Verriegelung zu lösen, und drehen - Dell PowerEdge 2850 | Processor Upgrade Installation
Guide - Page 29
werden kann. 7 Entnehmen Sie den neuen Prozessor der Verpackung. Falls Pins am Prozessor verbogen zu sein scheinen, erfahren Sie im Installations- und Fehlerbehebungshandbuch Ihres Systems unter „Wie Sie Hilfe bekommen", wie Sie technische Unterstützung anfordern können. Anleitung zum Prozessor - Dell PowerEdge 2850 | Processor Upgrade Installation
Guide - Page 30
eingesetzt, kann dies beim Einschalten des Systems eine dauerhafte Beschädigung des Prozessors und des Systems zur Folge haben. Wenn Sie den Prozessor nach unten, bis er einrastet und den Prozessor sichert. 10 Installieren Sie den Kühlkörper. a Wenn Sie einen 28 Anleitung zum Prozessor-Upgrade - Dell PowerEdge 2850 | Processor Upgrade Installation
Guide - Page 31
14 Schließen Sie das System. 15 Schließen Sie das System und die Peripheriegeräte wieder an System den neuen Prozessor und ändert automatisch die Systemkonfiguration im System-Setup-Programm. 16 Drücken Sie , um das System zur Verwendung des System-Setup-Programms finden Sie im Installations- und - Dell PowerEdge 2850 | Processor Upgrade Installation
Guide - Page 32
30 Anleitung zum Prozessor-Upgrade - Dell PowerEdge 2850 | Processor Upgrade Installation
Guide - Page 33
Dell™ PowerEdge www.dell.com | support.dell.com - Dell PowerEdge 2850 | Processor Upgrade Installation
Guide - Page 34
2004 ~ 2007 Dell Inc Dell Inc Dell、DELL PowerEdge は Dell Inc Intel および Xeon は Intel Corporation Dell Inc 2007 年 5 月 P/N F6587 Rev. A01 - Dell PowerEdge 2850 | Processor Upgrade Installation
Guide - Page 35
II Intel® Xeon® 2.8 GHz 4 MB の L2 www.dell.com および support.dell.com BIOS support.dell.com BIOS ZIF PGA(Pin Grid Array ZIF ZIF 1 2 AC 3 4 5 33 - Dell PowerEdge 2850 | Processor Upgrade Installation
Guide - Page 36
6 a b 1 c もう 1 d 手順 7 a 1 1-1 1-1 2) b 30 34 - Dell PowerEdge 2850 | Processor Upgrade Installation
Guide - Page 37
c もう 1 d e f 1-2 図 1-2 1 の角 1 の角 ZIF g 7 1 35 - Dell PowerEdge 2850 | Processor Upgrade Installation
Guide - Page 38
8 1 の角と ZIF 1 1-2 1 1 ZIF 9 a b 1 ZIF c 10 a 6 b c 1-1 d 2 1 1-1 e もう 1 36 - Dell PowerEdge 2850 | Processor Upgrade Installation
Guide - Page 39
11 12 13 14 15 16 - Dell PowerEdge 2850 | Processor Upgrade Installation
Guide - Page 40
38 - Dell PowerEdge 2850 | Processor Upgrade Installation
Guide - Page 41
Dell™ PowerEdge www.dell.com | support.dell.com - Dell PowerEdge 2850 | Processor Upgrade Installation
Guide - Page 42
2004-2007 Dell Inc Dell Inc Dell, DELL 로고 및 PowerEdge는 Dell Inc Intel 및 Xeon은 Intel Corporation Dell Inc 2007 년 5 월 P/N F6587 Rev. A01 - Dell PowerEdge 2850 | Processor Upgrade Installation
Guide - Page 43
II Intel® Xeon® Processor 2.8 계열 (L2 캐쉬 4MB www.dell.com 및 support.dell.com Dell support.dell.com BIOS BIOS ZIF PGA (Pin-Grid Array ZIF ZIF 1 2 AC 시오. 3 4 5 41 - Dell PowerEdge 2850 | Processor Upgrade Installation
Guide - Page 44
6 a b 90 c b d 7 a 90 1-1 1-1 2) 42 - Dell PowerEdge 2850 | Processor Upgrade Installation
Guide - Page 45
b 30 c d e 시오 . f 그림 1-2 그림 1-2 1 번 핀 프로세서 1 번 핀 ZIF 소켓 g 7 43 - Dell PowerEdge 2850 | Processor Upgrade Installation
Guide - Page 46
8 1번 핀과 ZIF 1 1-2 1 1 ZIF 9 a b 1 ZIF c 10 a 주: 단계 6 b c 1-1 d 1-1 e 44 - Dell PowerEdge 2850 | Processor Upgrade Installation
Guide - Page 47
11 12 13 14 15 16 - Dell PowerEdge 2850 | Processor Upgrade Installation
Guide - Page 48
46 - Dell PowerEdge 2850 | Processor Upgrade Installation
Guide - Page 49
Sistemas Dell™ PowerEdge™ Guía de instalación para actualización de procesadores www.dell.com | support.dell.com - Dell PowerEdge 2850 | Processor Upgrade Installation
Guide - Page 50
la reproducción de este documento en cualquier forma sin la autorización por escrito de Dell Inc. Marcas comerciales utilizadas en este texto: Dell, el logotipo de DELL y PowerEdge son marcas comerciales de Dell Inc.; Intel y Xeon son marcas comerciales registradas de Intel Corporation. Otras marcas - Dell PowerEdge 2850 | Processor Upgrade Installation
Guide - Page 51
procesadores del sistema. AVISO: si la parte frontal del chasis del sistema contiene la identificación "II," significa que el sistema puede actualizarse al procesador de doble núcleo Intel® Xeon® a 2,8 GHz con 4 MB de caché L2. Visite www.dell.com y support.dell.com para obtener información sobre la - Dell PowerEdge 2850 | Processor Upgrade Installation
Guide - Page 52
AVISO: al extraer el disipador de calor, es posible que el procesador se enganche al disipador de calor y se extraiga del zócalo. Se recomienda extraer el disipador de calor mientras el procesador esté caliente. 6 Si está instalando un procesador adicional: a Localice el zócalo del procesador - Dell PowerEdge 2850 | Processor Upgrade Installation
Guide - Page 53
b Espere 30 segundos para que el disipador de calor se suelte del procesador. c Abra la otra palanca de retención del disipador de calor. d Si el disipador de calor no se ha separado del procesador, gire con precaución el disipador de calor en el sentido de las agujas del reloj y después en sentido - Dell PowerEdge 2850 | Processor Upgrade Installation
Guide - Page 54
que encaje en su lugar, con lo que se fijará el procesador. 10 Instale el disipador de calor. a Si está actualizando un procesador existente, use un del procesador. b Aplique pasta térmica de manera uniforme en la parte superior del procesador. c Coloque el disipador de calor sobre el procesador - Dell PowerEdge 2850 | Processor Upgrade Installation
Guide - Page 55
del ventilador central o vuelva a colocar la cubierta del módulo de memoria (si procede). 12 Si ha colocado un procesador adicional, instale los ventiladores de refrigeración para el nuevo procesador. 13 Vuelva a colocar los ventiladores de refrigeración de procesadores (si procede). 14 Cierre - Dell PowerEdge 2850 | Processor Upgrade Installation
Guide - Page 56
54 Guía de instalación para actualización de microprocesadores
-
 1
1 -
 2
2 -
 3
3 -
 4
4 -
 5
5 -
 6
6 -
 7
7 -
8
-
9
-
10
-
11
-
12
-
13
-
14
-
15
-
16
-
17
-
18
-
19
-
20
-
21
-
22
-
23
-
24
-
25
-
26
-
27
-
28
-
29
-
30
-
31
-
32
-
33
-
34
-
35
-
36
-
37
-
38
-
39
-
40
-
41
-
42
-
43
-
44
-
45
-
46
-
47
-
48
-
49
-
50
-
51
-
52
-
53
-
54
-
55
-
56
 |
 |

www.dell.com | support.dell.com
Dell™ PowerEdge™ Systems
Processor Upgrade
Installation Guide
处理器升级安装指南
Guide d'installation pour la mise
à niveau du processeur
Anleitung zum Prozessor-Upgrade
プロセッサアップグレードイ
ンストールガイド
프로세서 업그레이드
설치 안내서
Guía de instalación para actualización
de procesadores