Dell PowerEdge 2850 Processor Upgrade Installation Guide - Page 7
See Installation, and Troubleshooting Guide - processor
 |
View all Dell PowerEdge 2850 manuals
Add to My Manuals
Save this manual to your list of manuals |
Page 7 highlights
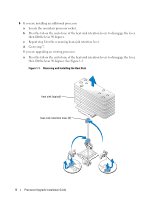
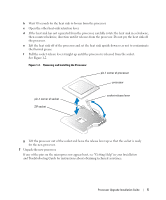
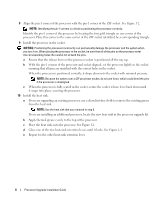
b Wait 30 seconds for the heat sink to loosen from the processor. c Open the other heat-sink retention lever. d If the heat sink has not separated from the processor, carefully rotate the heat sink in a clockwise, then counterclockwise, direction until it releases from the processor. Do not pry the heat sink off the processor. e Lift the heat sink off of the processor and set the heat sink upside down so as not to contaminate the thermal grease. f Pull the socket-release lever straight up until the processor is released from the socket. See Figure 1-2. Figure 1-2. Removing and Installing the Processor pin-1 corner of processor processor pin-1 corner of socket ZIF socket socket-release lever g Lift the processor out of the socket and leave the release lever up so that the socket is ready for the new processor. 7 Unpack the new processor. If any of the pins on the microprocessor appear bent, see "Getting Help" in your Installation and Troubleshooting Guide for instructions about obtaining technical assistance. Processor Upgrade Installation Guide 5
-
 1
1 -
 2
2 -
 3
3 -
 4
4 -
 5
5 -
 6
6 -
 7
7 -
 8
8 -
 9
9 -
 10
10 -
 11
11 -
 12
12 -
13
-
14
-
15
-
16
-
17
-
18
-
19
-
20
-
21
-
22
-
23
-
24
-
25
-
26
-
27
-
28
-
29
-
30
-
31
-
32
-
33
-
34
-
35
-
36
-
37
-
38
-
39
-
40
-
41
-
42
-
43
-
44
-
45
-
46
-
47
-
48
-
49
-
50
-
51
-
52
-
53
-
54
-
55
-
56
 |
 |
