Dell PowerEdge M830 Dell PowerEdge M830 (For Dell PowerEdge VRTX Enclosure) Ow - Page 80
Installing a hard drive/SSD, documentation supplied with your operating system.
 |
View all Dell PowerEdge M830 manuals
Add to My Manuals
Save this manual to your list of manuals |
Page 80 highlights
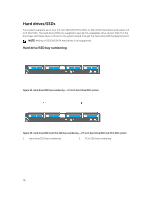
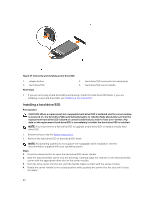
Figure 27. Removing and installing a hard drive/SSD 1. release button 3. hard drive/SSD Next steps 2. hard drive/SSD connector (on backplane) 4. hard drive/SSD carrier handle 1. If you are removing a hard drive/SSD permanently, install the hard drive/SSD blank. If you are installing a new hard drive/SSD, see Installing a hard drive/SSD. Installing a hard drive/SSD Prerequisites CAUTION: When a replacement hot-swappable hard drive/SSD is installed and the server module is powered on, the hard drive/SSD automatically begins to rebuild. Make absolutely sure that the replacement hard drive/SSD is blank or contains data that you wish to have over-written. Any data on the replacement hard drive/SSD is immediately lost after the hard drive/SSD is installed. NOTE: You must remove a hard drive/SSD to upgrade a hard drive/SSD or replace a faulty hard drive/SSD. 1. Ensure that you read the Safety instructions. 2. Remove the hard drive/SSD or hard drive/SSD blank. NOTE: All operating systems do not support hot-swappable drive installation. See the documentation supplied with your operating system. Steps 1. Press the release button to open the hard drive/SSD carrier handle. 2. Slide the hard drive/SSD carrier into the drive bay. Carefully align the channel on the hard drive/SSD carrier with the appropriate drive slot on the server module. 3. Push the drive carrier into the slot until the handle makes contact with the server module. 4. Rotate the carrier handle to the closed position while pushing the carrier into the slot until it locks into place. 80
-
 1
1 -
2
-
3
-
4
-
5
-
6
-
7
-
8
-
9
-
10
-
11
-
12
-
13
-
14
-
15
-
16
-
17
-
18
-
19
-
20
-
21
-
22
-
23
-
24
-
25
-
26
-
27
-
28
-
29
-
30
-
31
-
32
-
33
-
34
-
35
-
36
-
37
-
38
-
39
-
40
-
41
-
42
-
43
-
44
-
45
-
46
-
47
-
48
-
49
-
50
-
51
-
52
-
53
-
54
-
55
-
56
-
57
-
58
-
59
-
60
-
61
-
62
-
63
-
64
-
65
-
66
-
67
-
68
-
69
-
70
-
71
-
72
-
73
-
74
-
 75
75 -
 76
76 -
 77
77 -
 78
78 -
 79
79 -
 80
80 -
 81
81 -
 82
82 -
 83
83 -
 84
84 -
 85
85 -
86
-
87
-
88
-
89
-
90
-
91
-
92
-
93
-
94
-
95
-
96
-
97
-
98
-
99
-
100
-
101
-
102
-
103
-
104
-
105
-
106
-
107
-
108
-
109
-
110
-
111
-
112
-
113
-
114
-
115
-
116
-
117
-
118
-
119
-
120
-
121
-
122
-
123
-
124
-
125
-
126
-
127
-
128
-
129
-
130
-
131
 |
 |
