Dell Powerconnect W-ClearPass Virtual Appliances W-ClearPass Policy Manager 6. - Page 6
switch on, This starts the Policy Manager Configuration Wizard.
 |
View all Dell Powerconnect W-ClearPass Virtual Appliances manuals
Add to My Manuals
Save this manual to your list of manuals |
Page 6 highlights
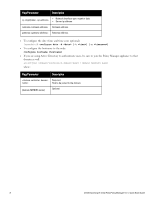
Required Item Item Information Hostname (Policy Manager server) Management Port IP Address Management Port Subnet Mask Management Port Gateway Data Port IP Address (optional) Data Port IP Address must not be in the same subnet as the Management Port IP Address Data Port Gateway (optional) Data Port Subnet Mask (optional) Primary DNS Secondary DNS NTP Server (optional) To set up the Policy Manager appliance: 1. Connect and power on. Using the null modem cable provided, connect a serial port on the appliance to a terminal, then connect power and switch on. The appliance immediately becomes available for configuration. Use the following parameters for the serial port connection: l Bit Rate: 9600 l Data Bits: 8 l Parity: None l Stop Bits: 1 l Flow Control: None 2. Login. Later, you will create a unique appliance/cluster administration password. For now, use the preconfigured credentials: login: appadmin password: eTIPS123 This starts the Policy Manager Configuration Wizard. 3. Configure the appliance. Replace the bolded placeholder entries in the following illustration with your local information: Enter hostname: hyperion.us.arubanetworks.com Enter Management Port IP Address: 192.168.5.10 Enter Management Port Subnet Mask: 255.255.255.0 Enter Management Port Gateway: 192.168.5.1 Enter Data Port IP Address: 192.168.7.55 Enter Data Port Subnet Mask: 255.255.255.0 Enter Data Port Gateway: 192.168.7.1 Enter Primary DNS: 198.168.5.3 6 Dell Networking W-ClearPass Policy Manager 6.0 | Quick Start Guide
-
 1
1 -
 2
2 -
 3
3 -
 4
4 -
 5
5 -
 6
6 -
 7
7 -
 8
8 -
 9
9 -
 10
10 -
 11
11 -
 12
12 -
13
-
14
-
15
-
16
-
17
-
18
-
19
-
20
-
21
-
22
-
23
-
24
-
25
-
26
-
27
-
28
 |
 |
