Dell Precision T7500 Setup and Features Information Tech Sheet - Page 2
Back Panel Connectors, Quick Setup, WARNING, CAUTION - diagnostic lights
 |
View all Dell Precision T7500 manuals
Add to My Manuals
Save this manual to your list of manuals |
Page 2 highlights
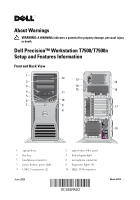
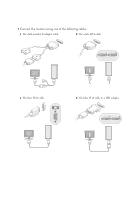
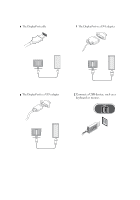
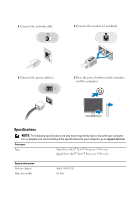
11 drive activity light 13 power connector 15 security cable slot 17 expansion card slots (7) 19 power supply diagnostic light Back Panel Connectors 1 12 optical drive eject button 14 cover-release latch and padlock ring 16 back panel connectors 18 power supply diagnostic button 2 34 5 6 7 8 12 11 10 9 1 parallel connector 3 eSATA connector 5 network activity light 7 link integrity light 9 USB 2.0 connectors (6) 11 IEEE 1394 connector 2 PS/2 mouse connector 4 line-out connector 6 network adapter connector 8 line-in connector 10 PS/2 keyboard connector 12 serial connector Quick Setup WARNING: Before you begin any of the procedures in this section, read the safety information that shipped with your computer. For additional best practices information see www.dell.com/regulatory_compliance. CAUTION: Do not install your computer in an enclosure where there is limited, restricted or no airflow. Restricting the airflow impacts your computer's performance, possibly causing it to overheat. If your computer is installed in a corner on a desk leave at least 5.1 cm (2 in) clearance from the back of the computer to the wall to permit the airflow required for proper ventilation. NOTE: Clean dust off the grill at the back of the computer whenever it is dusty. NOTE: Some devices shown below may not be included if you did not order them.
-
 1
1 -
 2
2 -
 3
3 -
 4
4 -
 5
5 -
 6
6 -
 7
7 -
 8
8
 |
 |