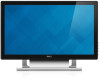
Dell S2240T 21.5 Dell S2240T Users Guide - Page 24
Removing the Monitor Stand, Wall Mounting (Optional
 |
View all Dell S2240T 21.5 manuals
Add to My Manuals
Save this manual to your list of manuals |
Page 24 highlights
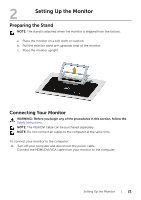
Removing the Monitor Stand NOTE: To prevent scratches on the LCD screen while removing the stand, ensure that the monitor is placed on a soft, clean surface. NOTE: This is applicable for a monitor with a stand. When any other stand is bought, please refer to the respective stand setup guide for the set-up instructions. To remove the stand: 1. Place the monitor on a soft cloth or cushion. 2. Loosen the two screws that secure the sand to the monitor. 3. Lift the stand up and away from the monitor. Wall Mounting (Optional) Refer to the instructions that come with the VESA-compatible wall mounting kit. 1. Place the monitor panel on a soft cloth or cushion on a stable, flat table. 2. Remove the stand. . (Screw dimension: M4 x 10 mm). 3. Attach the mounting bracket from the wall mounting kit to the monitor. 24 | Setting Up the Monitor
-
 1
1 -
2
-
3
-
4
-
5
-
6
-
7
-
8
-
9
-
10
-
11
-
12
-
13
-
14
-
15
-
16
-
17
-
18
-
 19
19 -
 20
20 -
 21
21 -
 22
22 -
 23
23 -
 24
24 -
 25
25 -
 26
26 -
 27
27 -
 28
28 -
 29
29 -
30
-
31
-
32
-
33
-
34
-
35
-
36
-
37
-
38
-
39
-
40
-
41
-
42
-
43
-
44
-
45
-
46
-
47
-
48
-
49
-
50
 |
 |
