Dell S4148F-ON Networking S4100-ON Series Set-Up Guide July 2017 - Page 17
Optics installation
 |
View all Dell S4148F-ON manuals
Add to My Manuals
Save this manual to your list of manuals |
Page 17 highlights
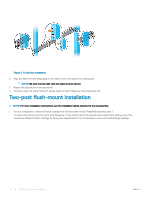
Figure 8. Front rack installation NOTE: Do not the use the mounted Ready-Rails as a shelf or a workplace. 3 Tighten the two thumb screws and rack screws. To remove the chassis from the rack or cabinet, press in the two side-release bars on the chassis at the same time and slide the chassis forward. Optics installation For a list of supported optics, see the S4100-ON Series data sheet at www.dell.com/support or contact your Dell representative. CAUTION: ESD damage can occur if components are mishandled. Always wear an ESD-preventive wrist or heel ground strap when handling the S4100-ON Series and its components. WARNING: When working with optical fibers, follow all warning labels and always wear eye protection. Never look directly into the end of a terminated or unterminated fiber or connector as it may cause eye damage. 1 Position the optic so it is in the correct position. The optic has a key that prevents it from being inserted incorrectly. 2 Insert the optic into the port until it gently snaps into place. NOTE: When you cable the ports, be sure not to interfere with the airflow from the small vent holes above and below the ports. S4100-ON Series installation 17
-
 1
1 -
2
-
3
-
4
-
5
-
6
-
7
-
8
-
9
-
10
-
11
-
 12
12 -
 13
13 -
 14
14 -
 15
15 -
 16
16 -
 17
17 -
 18
18 -
 19
19 -
 20
20 -
 21
21
 |
 |
