Dell TrueMobile 2350 Dell Wireless 2350 Broadband Router User's Guide - Page 18
Advanced Settings, Automatically obtain an IP address from a DHCP server, Submit, Warning, Continue
 |
View all Dell TrueMobile 2350 manuals
Add to My Manuals
Save this manual to your list of manuals |
Page 18 highlights
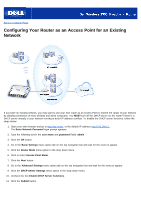
You will also need to allocate and setup a static IP address on your Dell Wireless 2350 Broadband Router. Perform the following steps to configure a static IP address: NOTE: The IP address that you use should be reserved by the DHCP server in your existing network. The router cannot act as a DHCP client and therefore, it needs a static IP address for its LAN interface. 1. Go to the Advanced Settings menu option tab on the top navigation bar and wait for the menu to appear. 2. Click the Advanced IP Settings menu option in the drop down menu. 3. Make sure that the box Automatically obtain an IP address from a DHCP server is unchecked. 4. Assign an IP address to the router. 4. Click the Submit button. 5. A pop-up Warning window will appear. Click the OK button. 6. A NOTE page will appear with the instructions on how to refresh the IP address of your computer. 7. Click the Continue button. 8. When your web browser returns to the home page of the Dell Wireless 2350 Broadband Router, the device has successfully restarted with the new settings. 9. Plug an Ethernet cable from the existing local network into any LAN port on the router. Back to Contents Page
-
 1
1 -
2
-
3
-
4
-
5
-
6
-
7
-
8
-
9
-
10
-
11
-
12
-
 13
13 -
 14
14 -
 15
15 -
 16
16 -
 17
17 -
 18
18 -
 19
19 -
 20
20 -
 21
21 -
 22
22 -
 23
23 -
24
-
25
-
26
-
27
-
28
-
29
-
30
-
31
-
32
-
33
-
34
-
35
-
36
-
37
-
38
-
39
-
40
-
41
-
42
-
43
-
44
-
45
-
46
-
47
-
48
-
49
-
50
-
51
-
52
-
53
-
54
-
55
-
56
-
57
-
58
-
59
-
60
-
61
-
62
-
63
-
64
-
65
-
66
-
67
-
68
-
69
-
70
-
71
-
72
-
73
-
74
-
75
-
76
-
77
-
78
-
79
-
80
-
81
-
82
-
83
-
84
-
85
-
86
-
87
-
88
-
89
-
90
-
91
-
92
-
93
-
94
-
95
-
96
-
97
-
98
-
99
-
100
-
101
-
102
-
103
-
104
-
105
-
106
-
107
-
108
-
109
-
110
-
111
-
112
-
113
-
114
-
115
-
116
-
117
-
118
-
119
-
120
-
121
-
122
-
123
-
124
-
125
-
126
-
127
-
128
-
129
-
130
-
131
-
132
-
133
-
134
-
135
-
136
-
137
-
138
-
139
-
140
-
141
-
142
-
143
-
144
-
145
-
146
-
147
-
148
-
149
-
150
-
151
-
152
-
153
-
154
-
155
-
156
-
157
-
158
-
159
-
160
-
161
-
162
-
163
-
164
-
165
-
166
-
167
-
168
-
169
-
170
-
171
-
172
-
173
-
174
-
175
-
176
-
177
-
178
-
179
-
180
-
181
-
182
-
183
-
184
-
185
-
186
-
187
-
188
-
189
-
190
-
191
-
192
-
193
-
194
-
195
-
196
-
197
-
198
-
199
-
200
-
201
-
202
-
203
-
204
-
205
-
206
-
207
-
208
-
209
-
210
-
211
 |
 |
