Dell V105 All In One Inkjet Printer User Guide - Page 7
Dell Ink Management System - cartridges
 |
View all Dell V105 All In One Inkjet Printer manuals
Add to My Manuals
Save this manual to your list of manuals |
Page 7 highlights
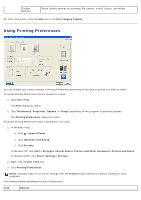
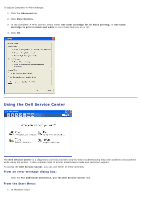
Print Setup Quality/Speed - Select Draft, Normal, or Photo depending on your desired output quality. Draft is the fastest option but should not be selected if you have a photo cartridge installed. Media Type - Allows you to set the paper type manually, or have the printer detect the paper type automatically. Paper Size - Select the size of your paper. Print in black and white - Print your color images in black and white to save the ink in your color cartridge. NOTE: You cannot select this setting if you have selected Use Color Cartridge for all Black Printing. Borderless - Select the check box if you want to print borderless photos. Orientation - Select how the document is arranged on the printed page. You can print using portrait or landscape orientation. Envelope - Select the check box if you want to print an envelope. The Paper Size area lists the envelope sizes available for printing. Copies - Customize how the printer prints several copies of a single print job: Collated, Normal, or Print Last Page First. Advanced 2-sided Printing - Select this to print on both sides of the paper, and whether or not to print an instruction page to assist in reloading paper. Layout - Select from Normal, Banner, Mirror, N-up, Poster, Booklet, or Borderless. Automatic Image Sharpening - Automatically select the best image-sharpening level based on image content. Dell Customer Experience Improvement Program - Allows you to access information about, and change your status in, the Dell Customer Experience Improvement Program. More Options - Allows you to specify Appearance Mode and Complete-A-Print settings. You can also view the paper type that the printer detects. Maintenance Install Ink Cartridges Clean Ink Cartridges Align Ink Cartridges Print a Test Page Network Support Dell Ink Management System Each time you print a job, a printing progress screen appears, which shows the progress of the print job as well as the amount of ink remaining and the approximate number of pages remaining in the cartridge. The page counter is hidden during the first 50 pages of cartridge use, until printing habits are learned and a more accurate count can be given. The number of pages remaining changes as a result of the type of print jobs the printer completes. When your ink cartridge levels are low, a Low Ink Warning appears on your screen when you try to print. This warning is displayed every time you print until you install a new ink cartridge. For more information, see Replacing Ink Cartridges. When one or both of your ink cartridges are empty, the Reserve Tank window appears on your screen when you try to print. If you continue printing, the print job may not print as you expect. If your black ink cartridge is out of ink, you can choose to print black from the color ink cartridge (Process Black) by selecting Complete-A-Print before clicking the Continue Printing button. If you select Complete-A-Print and click Continue Printing, Process Black is used for all black printing until the black cartridge is replaced, or the option is cleared from More Options, located on the Advanced tab of the Printing Preferences. The Reserve Tank dialog does not display again until after the low ink cartridge has been replaced. The Complete-A-Print check box is automatically reset when a new or different cartridge is installed. If your color ink cartridge is out of ink, you can choose to print color documents in grayscale by selecting Complete-APrint before clicking the Continue Printing button. If you select Complete-A-Print, and click Continue Printing, all color documents will print in black and white until the color cartridge is replaced or the option is cleared from More Options, located on the Advanced tab of the Printing Preferences. The Reserve Tank dialog does not display after the low ink cartridge has been replaced. The Complete-A-Print check box is automatically reset when a new or different cartridge is installed.
-
 1
1 -
 2
2 -
 3
3 -
 4
4 -
 5
5 -
 6
6 -
 7
7 -
 8
8 -
 9
9 -
 10
10 -
 11
11 -
 12
12 -
13
-
14
-
15
-
16
-
17
-
18
-
19
-
20
-
21
-
22
-
23
-
24
-
25
-
26
-
27
-
28
-
29
-
30
-
31
-
32
-
33
-
34
-
35
-
36
-
37
-
38
-
39
-
40
-
41
-
42
-
43
-
44
-
45
-
46
-
47
-
48
-
49
-
50
-
51
-
52
-
53
-
54
-
55
-
56
-
57
-
58
-
59
-
60
-
61
-
62
-
63
-
64
-
65
-
66
-
67
-
68
 |
 |
