Dell W-7024 SPR-WL2-MNT Installation Guide - Page 1
Dell W-7024 Manual
 |
View all Dell W-7024 manuals
Add to My Manuals
Save this manual to your list of manuals |
Page 1 highlights
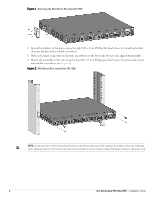
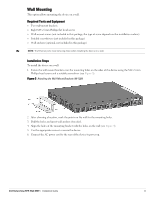
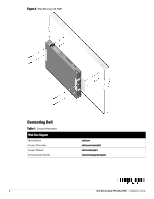
Dell Networking SPR-WL2-MNT Installation Guide This document provides installation instructions for mid-rack mounting and wall mounting the Dell W-7024/W7205 controller using the SPR-WL2-MNT accessory kit. The W-7024/W-7205 controller is referred to as "device" in rest of the document. Package Contents Two mid-mount brackets Two wall-mount brackets Eight M4 x 8 mm Phillips flat head screws Four M6 cage nuts Four M6 clip nuts Installation Guide (this document, printed) NOTE: The figures in this document illustrate the installation procedure for the W-7205 controller.The same installation procedure applies to the W-7024 controller. Mid-Mount Rack Mounting This option allows mounting the device from the middle in a standard two-post 19" Telco rack. Required Tools and Equipment Two mid-mount brackets Eight M4 x 8 mm Phillips flat head screws Four M6 x 15 mm Phillips pan head screws (not included in this package, included in the device package) Four M6 cage nuts (optional) Four M6 clip nuts (optional) Suitable screwdrivers (not included in this package) NOTE: Some racks require screws that differ from those included with the device. Confirm that you have the correct screws before installing the device. CAUTION: Each device should have its own mounting equipment. Do not place other networking equipment directly on top of a mounted device. Failure to do so can result in damage to the device. Installation Steps To install the device in a two-point 19" (48.26 cm) rack system: 1. Place a mid-mount bracket over the mounting holes on either side of the device in the middle (see Figure 1). 0511741-01 | February 2015 1
-
 1
1 -
 2
2 -
 3
3 -
 4
4
 |
 |