Dell W-Series 277 AP-270-MNT-H1 Horizontal Mounting Kit Installation Guide - Page 8
Mounting the AP to a Pole,
 |
View all Dell W-Series 277 manuals
Add to My Manuals
Save this manual to your list of manuals |
Page 8 highlights
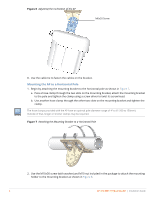
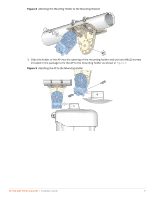
Figure 13 Attaching the AP to the Mounting Holder Figure 14 Attaching the AP to the Mounting Holder (Completed) The inclination of the AP (mounted to the mounting holder) can be adjusted up to +/-45 degrees by inserting the M6x20 screw (included in the package) into the different holes on the mounting holder. 8. Use the cable tie to fasten the cables on the bracket. Mounting the AP to a Pole 1. Begin by attaching the mounting bracket to the pole as shown in Figure 15. a. Pass a hose clamp through the two slots on the mounting bracket, attach the mounting bracket to the pole and tighten the clamp using a screw driver to twist its screw head. b. Use another hose clamp through the other two slots on the mounting bracket and tighten the clamp. 8 AP-270-MNT-H1 Mounting Kit | Installation Guide
-
 1
1 -
2
-
 3
3 -
 4
4 -
 5
5 -
 6
6 -
 7
7 -
 8
8 -
 9
9 -
 10
10 -
 11
11 -
 12
12
 |
 |
