Dell XPS 13 9315 XPS 13 9315 / XPS 9315 Setup and Specifications - Page 4
Set up your XPS 13 9315
 |
View all Dell XPS 13 9315 manuals
Add to My Manuals
Save this manual to your list of manuals |
Page 4 highlights
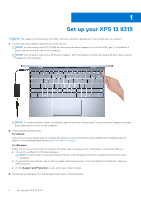
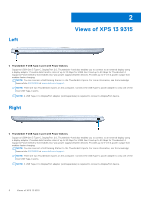
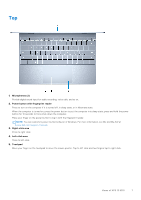
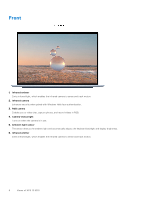
1 Set up your XPS 13 9315 NOTE: The images in this document may differ from your computer depending on the configuration you ordered. 1. Connect the power adapter and press the power button. NOTE: You can charge your XPS 13 9315 by connecting the power adapter to one of the USB Type-C Thunderbolt 4 ports that are on either side of your computer. NOTE: Your computer ships with a 45 W power adapter. Dell Technologies recommends using a 60 W (or above) power adapter for fast charging. NOTE: To conserve battery power, the battery might enter power-saving mode. Connect the power adapter and press the power button to turn on the computer. 2. Finish operating system setup. For Ubuntu: Follow the on-screen instructions to complete the setup. For more information about installing and configuring Ubuntu, search in the Knowledge Base Resource at www.dell.com/support. For Windows: Follow the on-screen instructions to complete the setup. When setting up, Dell Technologies recommends that you: ● Connect to a network for Windows updates. NOTE: If connecting to a secured wireless network, enter the password for the wireless network access when prompted. ● If connected to the Internet, sign in with or create a Microsoft account. If not connected to the Internet, create an offline account. ● On the Support and Protection screen, enter your contact details. 3. Locate and use Dell apps from the Windows Start menu-Recommended. 4 Set up your XPS 13 9315
-
 1
1 -
 2
2 -
 3
3 -
 4
4 -
 5
5 -
 6
6 -
 7
7 -
 8
8 -
 9
9 -
 10
10 -
11
-
12
-
13
-
14
-
15
-
16
-
17
-
18
-
19
-
20
-
21
-
22
 |
 |
