Dell Z9264F-ON EMC PowerSwitch Setup Guide - Page 11
Optics installation
 |
View all Dell Z9264F-ON manuals
Add to My Manuals
Save this manual to your list of manuals |
Page 11 highlights
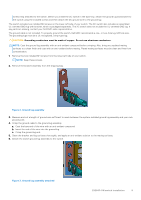
● Reliable earthing-Maintain reliable earthing of rack-mounted equipment. Pay particular attention to the supply connections other than the direct connections to the branch circuit, for example: use of power strips. ● Do not mount the equipment with the fan panel facing in the downward position. Switch installation and removal 1. Align the system with the rails and slide the system into the rack. 2. Tighten the screws on each side of the systems's front panel, items 1 and 2. 3. To remove the system from the rack, loosen the screws and slide the system out of the rack. Figure 5. Z9264F-ON installation 1. Extra screws to restrict front-back movement of the switch. 2. Main screw. Optics installation WARNING: When working with optical fibers, follow all warning labels and always wear eye protection. Never look directly into the end of a terminated or unterminated fiber or connector as it may cause eye damage. 1. Position the optic so it is in the correct position. The optic has a key that prevents it from being inserted incorrectly. 2. Insert the optic into the port until it gently snaps into place. NOTE: When you cable the ports, be sure not to interfere with the airflow from the small vent holes above and below the ports. Z9264F-ON switch installation 11
-
 1
1 -
2
-
3
-
4
-
5
-
 6
6 -
 7
7 -
 8
8 -
 9
9 -
 10
10 -
 11
11 -
 12
12 -
 13
13 -
 14
14 -
 15
15
 |
 |
