Denon 500M Operating Instructions - Page 4
Assembly - turntable
 |
UPC - 081757505758
View all Denon 500M manuals
Add to My Manuals
Save this manual to your list of manuals |
Page 4 highlights
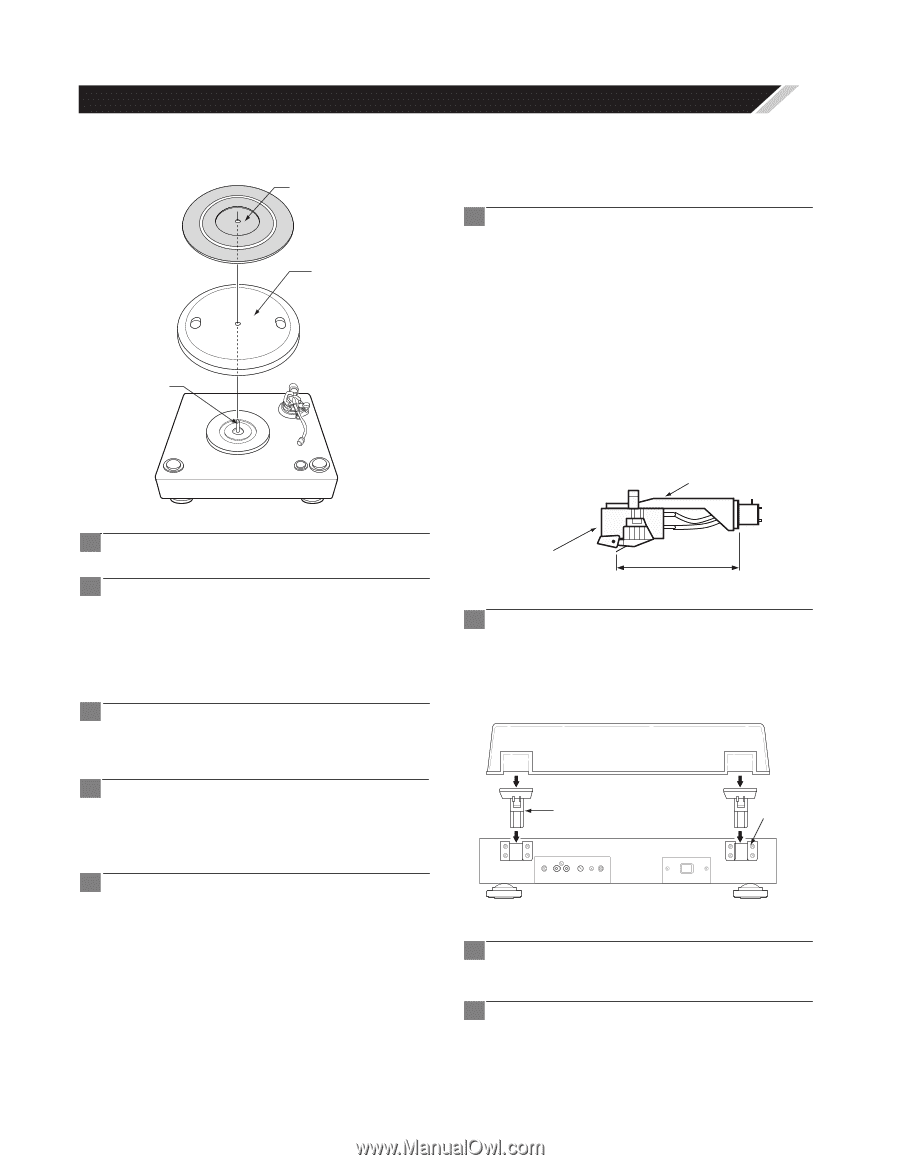
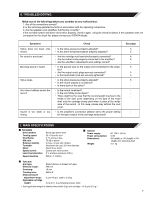
2. ASSEMBLY • Do not plug in the power cord until assembly is completed. (1) Mounting the turntable Turntable sheet Turntable Motor shaft (3) Mounting the cartridge • The cartridge is not included. 1 Mount your cartridge on the head shell. • The head shell's lead wires are color-coded. Use tweezers or the like to securely connect the lead wires to the corresponding terminals on the cartridge, referring to the indications on the cartridge or the cartridge's instructions. Red right channel (R) White left channel (L) Green right channel ground (RG) Blue left channel ground (LG) • A predetermind overhang will be obtained, if it attaches so that the needle point may come to the position of 54mm from head shell attachement edge(rubber washer part) as shown in the following figure. head shell 1 Remove all the parts in the box. 2 Remove the packaging materials from the main unit and all the parts. • Set the parts on the floor, a table or another stable surface when removing the packaging materials. Handling the parts roughly could result in scratches or deformation. 3 Insert the turntable onto the motor shaft. • Be careful not to scratch the magnet ring on the bottom side of the turntable. cartridge (sold separately) 54mm 2 Insert the head shell on which the cartridge has been mounted into the tone arm and fasten it in place using the lock nut. (4) Mounting the dust cover 4 Set the turntable sheet on the turntable, lining it up with the motor shaft. Hinge Holder (2) Mounting the counterweight. 1 Mount the counterweight on the shaft at the back of the tone arm. RL OUTPUT GND 1 Securely insert the two included hinges into the holder in the rear of the cabinet. 2 Line up with the hole of dust cover with the hinges and insert it securely in the direction of the arrows. • To remove the dust cover, open it fully and pull it out of the hinges in the opposite direction of the arrows. • Hold the dust cover near the hinges when mounting and removing it. 4
-
 1
1 -
 2
2 -
 3
3 -
 4
4 -
 5
5 -
 6
6 -
 7
7 -
 8
8
 |
 |