Denon 500M Operating Instructions - Page 5
Adjustments - turntables
 |
UPC - 081757505758
View all Denon 500M manuals
Add to My Manuals
Save this manual to your list of manuals |
Page 5 highlights
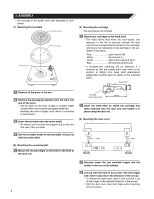
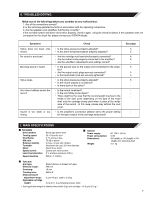
3. ADJUSTMENTS • Turn the power off when performing adjustments. (1) Stylus pressure and anti-skating adjustment 1 Set the anti-skating knob to "0". 2 Lower the lifter lever, and move the tone arm. • Lift the tone arm from the armrest and move it over the turntable. 5 Hold the counterweight with a finger so that it does not move, then turn the stylus pressure adjustment ring so that the back center line on the back of the tone arm is at "0". 3.0 2.5 2.0 0 3.5 0.5 1.0 1.5 • When moving the tone arm, lower the cartridge's stylus cover and be careful that the stylus does not directly touch the turntable or other parts. • For cartridges with detachable stylus covers, adjust with the stylus cover removed. 3 Adjust the horizontal balance. • Move the counterweight forward or backward so that the tone arm is parallel to the turntable's surface when the tone arm is released. Set parallel • When adjusting the horizontal balance, be careful that the stylus does not touch the turntable sheet or the main unit. 6 Turn the counterweight in the direction of the arrow A and set it for the proper stylus pressure for the cartridge you are using. • When the counterweight is turned, the stylus pressure adjustment ring also turns. Read the value on the adjustment ring to set the proper stylus pressure. • Please refer to the instruction manual of the cartridge for set stylus pressure. 7 Turn the anti-skating knob and set it so that the value of the cartridge's stylus pressure is lined up with the reference line. • This provides the proper anti-skating force. I-SKATING 0 ANT 1 2 3 4 Set the tone arm back on the armrest. Set the tone arm back on the armrest. 5
-
 1
1 -
 2
2 -
 3
3 -
 4
4 -
 5
5 -
 6
6 -
 7
7 -
 8
8
 |
 |