Denon AVR 1906 Owners Manual - Page 17
Connecting a VCR, Connecting a tape deck, Connecting a CD recorder or MD recorder
 |
UPC - 081757506557
View all Denon AVR 1906 manuals
Add to My Manuals
Save this manual to your list of manuals |
Page 17 highlights
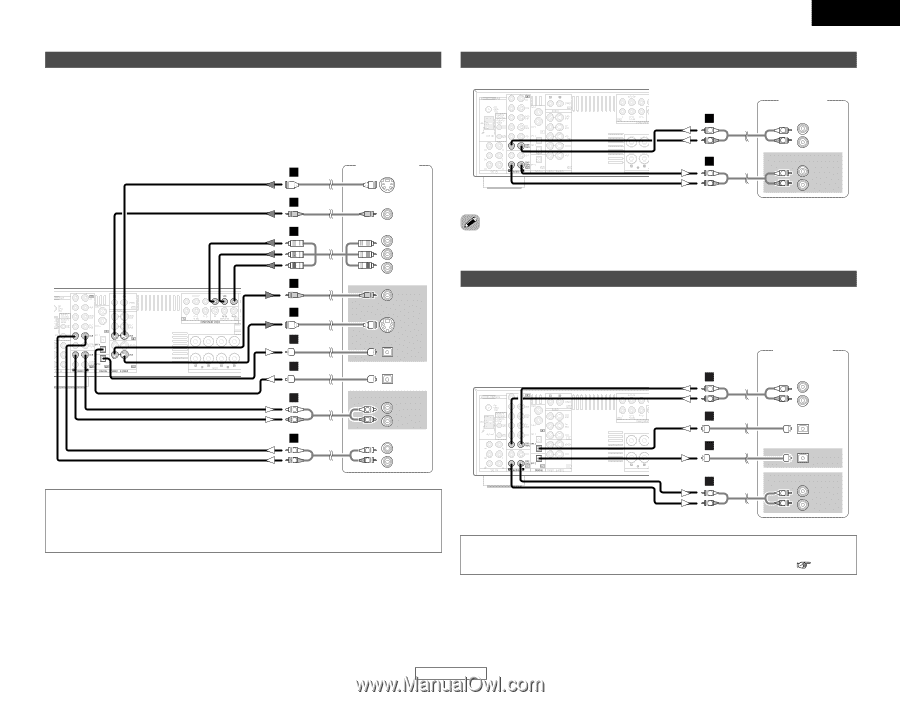
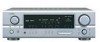
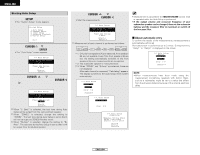
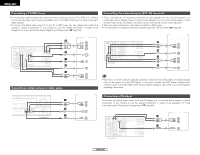
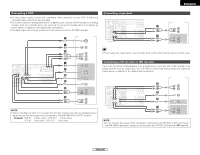
Connecting Other Sources Connecting a VCR • For best picture quality choose the component video connection to your VCR. S-Video and composite video outputs are also provided. • If you wish to perform analog dubbing from a digital source, such as a DVD recorder to an analog recorder such as a cassette deck, you will need to connect the analog inputs and outputs as shown below, in addition to the digital audio connections. • The digital inputs and outputs connection is the same as that for a CD (MD) recorder. Video deck G S VIDEO OUT F VIDEO OUT H COMPONENT VIDEO OUT Y PB PR F VIDEO IN G S VIDEO IN D OPTICAL IN D OPTICAL OUT A AUDIO IN L L L R R R A AUDIO OUT L L L R R R NOTE: • When recording to a VCR, it is necessary that the type of cable used with the playback source equipment be the same type that is connected to the AVR-1906 VCR OUTPUT terminal. Example: VCR IN → S-Video cable : VCR OUT → S-Video cable VCR IN → Video cable : VCR OUT → Video cable Connecting a tape deck ENGLISH Connecting Other Sources Tape deck A AUDIO OUT L L L R R R A AUDIO IN L L L R R R • If humming noise is generated, move the tape deck further away from the source of such noise. Connecting a CD recorder or MD recorder If you wish to perform analog dubbing from a digital source, such as a CD or MD recorder to an analog recorder such as a tape deck, you will need to connect the analog inputs and outputs as shown below, in addition to the digital audio connections. CD recorder / MD recorder A AUDIO OUT L L L R R R D OPTICAL OUT D OPTICAL IN A AUDIO IN L L L R R R NOTE: • Do not connect the output of the component connected to the OPTICAL 2 OUT terminal on the AVR-1906's rear panel to any terminal other than the OPTICAL 2 IN terminal ( page 40). 14 ENGLISH
-
 1
1 -
2
-
3
-
4
-
5
-
6
-
7
-
8
-
9
-
10
-
11
-
 12
12 -
 13
13 -
 14
14 -
 15
15 -
 16
16 -
 17
17 -
 18
18 -
 19
19 -
 20
20 -
 21
21 -
 22
22 -
23
-
24
-
25
-
26
-
27
-
28
-
29
-
30
-
31
-
32
-
33
-
34
-
35
-
36
-
37
-
38
-
39
-
40
-
41
-
42
-
43
-
44
-
45
-
46
-
47
-
48
-
49
-
50
-
51
-
52
-
53
-
54
-
55
-
56
-
57
-
58
-
59
-
60
-
61
-
62
-
63
-
64
-
65
-
66
-
67
 |
 |