Denon AVR-3312CI AVR3312CI_OwnersManual - Page 72
Set up Channel Select, ENTER, RETURN
 |
UPC - 883795002042
View all Denon AVR-3312CI manuals
Add to My Manuals
Save this manual to your list of manuals |
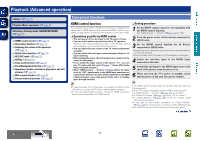
Page 72 highlights
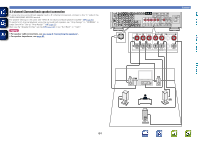
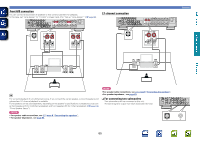
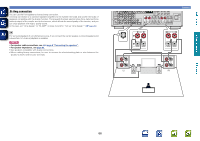
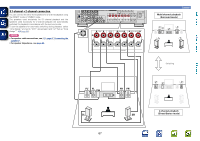
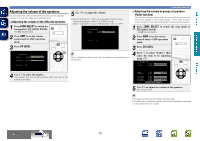
Basic version Advanced version 4 Use o p to select the configuration of the connected speakers. NORMAL Select the "NORMAL" setting to perform 7.2-channel playback using the surround back, front height, or front wide speakers. ZONE2 Select the "ZONE2" setting to assign the unit's builtin power amplifier for ZONE2 and output the audio in stereo. ZONE3 Select the "ZONE3" setting to assign the unit's builtin power amplifier for ZONE3 and output the audio in stereo. Z2/Z3(M) Select the "Z2/Z3(M)" setting to assign the unit's built-in power amplifier for ZONE2 and ZONE3 and output the audio in monaural. Bi-AMP Select the "Bi-AMP" setting to connect the front speakers via the bi-amp connection. 2CH When you perform 2-channel playback in the DIRECT or STEREO mode, select the "2CH" setting to use the other front speakers for playback. Front B Select the "Front B" setting to use the second set of front speakers for playback. 5 Press RETURN B to exit the "Amp Assign" setting. 6 Set up "Channel Select" Use ui to select "Channel Select", and then press ENTER. AUDYSSEY AUTO SETUP STEP1 Preparation 1 2 3 4 5 6 Connect the speakers and place them according to the recommendations in the manual, Set the following items If necessary. Amp Assign Channel Select Auto Setup Start Enter RETURN Cancel Enable skip of measuring unused channels to reduce time AUDYSSEY AUTO SETUP STEP1 Preparation Channel Select 1 2 3 4 5 6 ConneScut bthweosopfeerakers and place tMheemasuacrecording to the recommendations in the manual, Set the following items If necessary. Amp Assign Channel Select Measure subwoofer channel Auto Setup Start Enter Enter RETURRENTURNCaCnacnecl el Enable skip of measuring unused channels to reduce time Set up speakers 7 Use ui to select a channel. Front Select for setting the front speakers to be used. In this case, go to step 8. • "Front" can be set when "Amp Assign" is set to "Front B". Subwoofer Surround Back Front Height Select for no subwoofers to be used. In this case, go to step 9. Select the number of surround back speakers to be used. In this case, go to step 10. • "Surround Back" can be set when "Amp Assign" is set to "NORMAL". Select for no front height speakers to be used. In this case, go to step 11. • "Front Height" can be set when "Amp Assign" is set to "NORMAL". Front Wide Select for no front wide speakers to be used. In this case, go to step 12. • "Front Wide" can be set when "Amp Assign" is set to "NORMAL". 8 Press o p to select a front speaker. A Select this to use front speaker A. B Select this to use front speaker B. A+B Select this to use front speakers A and B simultaneously. vSee overleaf Information 69
-
 1
1 -
2
-
3
-
4
-
5
-
6
-
7
-
8
-
9
-
10
-
11
-
12
-
13
-
14
-
15
-
16
-
17
-
18
-
19
-
20
-
21
-
22
-
23
-
24
-
25
-
26
-
27
-
28
-
29
-
30
-
31
-
32
-
33
-
34
-
35
-
36
-
37
-
38
-
39
-
40
-
41
-
42
-
43
-
44
-
45
-
46
-
47
-
48
-
49
-
50
-
51
-
52
-
53
-
54
-
55
-
56
-
57
-
58
-
59
-
60
-
61
-
62
-
63
-
64
-
65
-
66
-
 67
67 -
 68
68 -
 69
69 -
 70
70 -
 71
71 -
 72
72 -
 73
73 -
 74
74 -
 75
75 -
 76
76 -
 77
77 -
78
-
79
-
80
-
81
-
82
-
83
-
84
-
85
-
86
-
87
-
88
-
89
-
90
-
91
-
92
-
93
-
94
-
95
-
96
-
97
-
98
-
99
-
100
-
101
-
102
-
103
-
104
-
105
-
106
-
107
-
108
-
109
-
110
-
111
-
112
-
113
-
114
-
115
-
116
-
117
-
118
-
119
-
120
-
121
-
122
-
123
-
124
-
125
-
126
-
127
-
128
-
129
-
130
-
131
-
132
-
133
-
134
-
135
-
136
-
137
-
138
-
139
-
140
-
141
-
142
-
143
-
144
-
145
-
146
-
147
-
148
-
149
-
150
-
151
-
152
-
153
-
154
-
155
-
156
-
157
 |
 |
