Denon DNX500 Operating Instructions - Page 11
Replacing The Channel Fader, Only Dn-x900 : Flex Fader Crossfader Slide, Torque Adjustment Procedure - channel fader replacement
 |
UPC - 081757506649
View all Denon DNX500 manuals
Add to My Manuals
Save this manual to your list of manuals |
Page 11 highlights
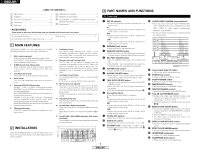
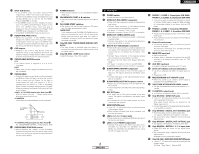
6 REPLACING THE CROSSFADER The Crossfader may be removed without disassembly of DN-X500 and DN-X900 itself. 1. Pull out the crossfader knob. 2. Removed the two outer screws A attaching the crossfader plate. 3. Remove the two screws B attaching the crossfader bracket assembly from chassis. 4. Pull the crossfader bracket assembly forward and unplug the 3P cable from the connector on the panel board. A B ENGLISH 8 ONLY DN-X900 : FLEX FADER CROSSFADER SLIDE TORQUE ADJUSTMENT PROCEDURE 1. Follow the procedure at "REPLACING THE CROSSFADER" to remove the crossfader from the set. 2. Move the lever so that the head of the screw is positioned at the hole in the case. 3. Turn the screw using a screwdriver, move the lever and adjust to the desired torque. 4. Reinstall the crossfader following the removal procedure in reverse order. 7 REPLACING THE CHANNEL FADER The Channel fader may be removed without any disassembly of the DN-X500 and DN-X900 itself. 1. Pull out the channel fader knob. 2. Remove the two outer screws A attaching the channel fader plate and channel fader bracket assembly from the front panel. 3. Pull the channel fader bracket assembly forward and unplug the 3P cable from the connector on the channel fader printing board. 4. Install the replacement assembly by reversing above instructions. A 6 ENGLISH
-
 1
1 -
2
-
3
-
4
-
5
-
 6
6 -
 7
7 -
 8
8 -
 9
9 -
 10
10 -
 11
11 -
 12
12 -
 13
13 -
 14
14 -
 15
15 -
 16
16 -
17
-
18
-
19
-
20
-
21
-
22
-
23
-
24
-
25
-
26
-
27
-
28
-
29
-
30
-
31
-
32
-
33
-
34
-
35
-
36
-
37
-
38
-
39
-
40
-
41
-
42
-
43
-
44
-
45
-
46
-
47
-
48
-
49
-
50
-
51
-
52
-
53
-
54
-
55
-
56
-
57
-
58
-
59
-
60
-
61
-
62
-
63
 |
 |
