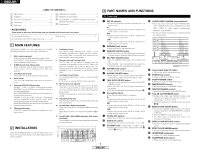
Denon DNX500 Operating Instructions - Page 8
Connections - dn x500 mixer
 |
UPC - 081757506649
View all Denon DNX500 manuals
Add to My Manuals
Save this manual to your list of manuals |
Page 8 highlights
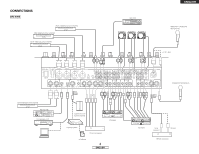
ENGLISH 4 CONNECTIONS Refer to the Connection Diagram below. 1. Make certain AC power is off while making connections. 2. Quality cables make a big difference in fidelity and punch. Use high-quality, audio cables. 3. Do not use excessively long cables. Be sure plugs and jacks are securely fastened. Loose connections cause hum, noise, or intermittence that could damage your speakers. 4. Connect all stereo input sources. Then connect any effects into the stereo Effect, if used. Connect your Microphone(s) and monitor headphones. Make sure all faders are at "zero" and the unit is off. Take care to connect only one cable at a time. pay attention to L and R position of jacks, on both the DN-X500/DN-X900 and outboard gear. 5. Connect the stereo outputs to the power amplifier(s) and/or tape deck(s) and/or MD recorder(s) and/or CD recorder(s). Plug the DN-X500/DN-X900 into AC power outlet. DN-X500 Main unbalanced power amplifier Main balanced power amplifier Booth / power amplifier NOTE: Always switch on your audio input sources such as CD players first, then your mixer, and finally any amplifiers. When turning off, always reverse this operation by turning off amplifiers, then your mixer, and then input units. Tape deck Balanced or unbalanced Microphones CD player OPEN/ CLOSE 1 SEARCH SCAN TRACK M S F T. REMAIN ELAPSED SINGLE CONTINUE PITCH% JOG MODE CONT./ SINGLE TIME CUE PITCH PITCH PITCH BEND PLAY/PAUSE 0% TRACK CUE 1 OPEN/ CLOSE 2 SEARCH SCAN REMOTE CONTROL UNIT RC-47 OPEN/CLOSE 1 OPEN/CLOSE 2 TRACK M S F T. REMAIN ELAPSED SINGLE CONTINUE PITCH% JOG MODE CONT./ SINGLE TIME CUE PITCH PITCH PITCH BEND PLAY/PAUSE 0% TRACK CUE 2 POWER ON OFF Turntable 2 Turntable 1 ANTI-S 1 3 2 ANTI-S 1 3 2 43 210 4 43 210 4 SLOW BRAKE OFF ON POWER START /STOP 78 33 45 765 765 KATING 0 KEY ADJUST PITCH -12 Quartz 0 +12 DP-DJ151 Digital SLOW BRAKE OFF ON POWER START /STOP 78 33 45 KATING 0 KEY ADJUST PITCH -12 Quartz 0 +12 DP-DJ151 Digital ON OFF POWER or 1/4" Jack GND Cold Hot MADE IN CHINA FABRIQUE EN CHINA BOOTH R L RL LR RL LR LR LR BALANCED R FREQ. MASTER OUT UNBALANCED REC OUT ATT. -10dB OFF ON L MONO OFF ON R L R SEND L(MONO) R RETURN L(MONO) LINE 8 LINE 7 LINE 6 LINE 5 L L R R LINE 8 LINE 6 LINE 4 PHONO2/ LINE 3 LINE 2 PHONO1/ LINE 1 L SIGNAL GND L SIGNAL GND PH LN R PH LN R LINE 4 LINE 2 TALK OVER MAIN MIC 40Hz 200Hz SUB WOOFER/LIGHTING 1/4" Jack Hot Cold GND EFFECT FADER FADER X-CONTROL FADER FADER - -20dB LR LR LR LR AUX MIC 1/4" Jack Microphones 1/4" Mono Jack Subwoofer with Built-in amplifier Effects processor Lighting system or Lighting OPEN/ CLOSE 1 CONT./SINGLE TIME MEMO BRAKE PITCH KEY OPEN/ CLOSE 2 CONT./SINGLE TIME MEMO BRAKE PITCH KEY END MON. NEXT TR. START END MON. SEARCH SEARCH EFFECT LOOP SCAN A 1 2 FIL REVERSE TAP STOP B RVB PROGRAM EXIT/ RELOOP FLG PUSH ENTER LOOP PITCH ON/OFF PLAY/WRITE DATA MASTER CUE PLAY/PAUSE MODE CUE PRESET 1 PITCH BEND NEXT TR. START END MON. SEARCH SEARCH EFFECT 0% REMOTE CONTROL UNIT RC-46 LOOP SCAN A 1 2 FIL REVERSE TAP STOP B RVB PROGRAM EXIT/ RELOOP FLG PUSH ENTER LOOP PITCH ON/OFF PLAY/WRITE DATA MASTER CUE PLAY/PAUSE MODE CUE PRESET OPEN/CLOSE OPEN/CLOSE 1 2 2 PITCH BEND 0% POWER ON OFF CD player 3 ENGLISH DIGI-S KEY BEND DIGI-S KEY BEND DIGI-S KEY BEND DIGI-S KEY BEND OPEN/ CLOSE 1 CONT./SINGLE TIME MEMO BRAKE PITCH KEY OPEN/ CLOSE 2 CONT./SINGLE TIME MEMO BRAKE PITCH KEY END MON. NEXT TR. START END MON. SEARCH SEARCH EFFECT LOOP SCAN A 1 2 FIL REVERSE TAP STOP B RVB PROGRAM EXIT/ RELOOP FLG PUSH ENTER LOOP PITCH ON/OFF PLAY/WRITE DATA MASTER CUE PLAY/PAUSE MODE CUE PRESET 1 PITCH BEND NEXT TR. START END MON. SEARCH SEARCH EFFECT 0% REMOTE CONTROL UNIT RC-46 LOOP SCAN A 1 2 FIL REVERSE TAP STOP B RVB PROGRAM EXIT/ RELOOP FLG PUSH ENTER LOOP PITCH ON/OFF PLAY/WRITE DATA MASTER CUE PLAY/PAUSE MODE CUE PRESET OPEN/CLOSE OPEN/CLOSE 1 2 2 PITCH BEND 0% POWER ON OFF CD player
-
 1
1 -
2
-
 3
3 -
 4
4 -
 5
5 -
 6
6 -
 7
7 -
 8
8 -
 9
9 -
 10
10 -
 11
11 -
 12
12 -
 13
13 -
14
-
15
-
16
-
17
-
18
-
19
-
20
-
21
-
22
-
23
-
24
-
25
-
26
-
27
-
28
-
29
-
30
-
31
-
32
-
33
-
34
-
35
-
36
-
37
-
38
-
39
-
40
-
41
-
42
-
43
-
44
-
45
-
46
-
47
-
48
-
49
-
50
-
51
-
52
-
53
-
54
-
55
-
56
-
57
-
58
-
59
-
60
-
61
-
62
-
63
 |
 |
