Dewalt DCF680N1 Instruction Manual - Page 13
Operation as a Screwdriver, MAINTENANCE, Cleaning - not working
 |
View all Dewalt DCF680N1 manuals
Add to My Manuals
Save this manual to your list of manuals |
Page 13 highlights
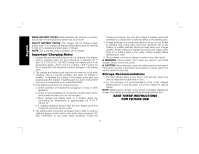
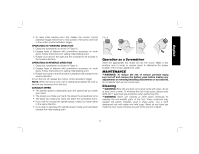
English 4. To reset initial starting point first release the motion control activation trigger. Move tool to new position, then press and hold in the motion control activation trigger. OPERATING IN FORWARD DIRECTION 1. Grasp the screwdriver as shown in Figure 6. 2. Engage head of fastener with screwdriver accessory on work piece. Follow instructions for setting initial starting point. 3. Rotate your hand to the right and the screwdriver will activate in the forward direction. OPERATING IN REVERSE DIRECTION 1. Grasp the screwdriver as shown in Figure 6. 2. Engage head of fastener with screwdriver accessory on work piece. Follow instructions for setting initial starting point. 3. Rotate your hand to the left and the screwdriver will activate in the reverse direction. To turn the tool off, release the motion control activation trigger. NOTE: When the tool is not in use or during transit please be sure to remove any accessory from the tool. VARIABLE SPEED • The spindle speed is dependent upon the speed that you rotate your hand. • The slower you rotate your hand, the slower the screwdriver turns. • The faster you rotate your hand, the faster the screwdriver turns. • If you wish to increase the spindle speed, rotate your hand further in the same direction. • If you wish to decrease the spindle speed, rotate your hand back towards the initial starting point FIG. 6 Operation as a Screwdriver Insert the appropriate hex shank bit into the chuck. Make a few practice runs in scrap or unseen areas to determine the proper position of the torque adjustment collar. MAINTENANCE WARNING: To reduce the risk of serious personal injury, turn tool off and remove the battery pack before making any adjustments or removing/installing attachments or accessories. An accidental start-up can cause injury. Cleaning WARNING: Blow dirt and dust out of all air vents with clean, dry air at least once a week. To minimize the risk of eye injury, always wear ANSI Z87.1 approved eye protection when performing this. WARNING: Never use solvents or other harsh chemicals for cleaning the non-metallic parts of the tool. These chemicals may weaken the plastic materials used in these parts. Use a cloth dampened only with water and mild soap. Never let any liquid get inside the tool; never immerse any part of the tool into a liquid. 11
-
 1
1 -
2
-
3
-
4
-
5
-
6
-
7
-
 8
8 -
 9
9 -
 10
10 -
 11
11 -
 12
12 -
 13
13 -
 14
14 -
 15
15 -
 16
16 -
 17
17 -
 18
18 -
19
-
20
-
21
-
22
-
23
-
24
-
25
-
26
-
27
-
28
-
29
-
30
-
31
-
32
-
33
-
34
-
35
-
36
-
37
-
38
-
39
-
40
-
41
-
42
-
43
-
44
-
45
-
46
-
47
-
48
 |
 |