Dewalt DCN660D1 Instruction Manual - Page 10
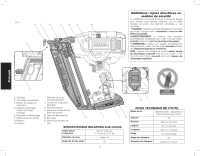
Mode Selection, Preparing the Tool, Using the Trigger Lock-off Fig. 7, Loading the Tool Fig. 8
 |
View all Dewalt DCN660D1 manuals
Add to My Manuals
Save this manual to your list of manuals |
Page 10 highlights
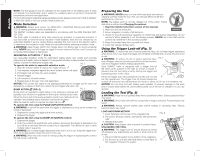
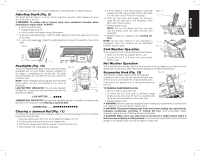
English NOTE: The fuel gauge is only an indication of the charge left on the battery pack. It does not indicate tool functionality and is subject to variation based on product components, temperature and end-user application. For more information regarding fuel gauge battery packs, please contact call 1-800-4-DeWALT (1-800-433-9258) or visit our website www.dewalt.com. Mode Selection WARNING: Always wear proper eye [ANSI Z87.1 (CAN/CSA Z94.3)] and ANSI S12.6 (S3.19) hearing protection when operating tool. The DeWALT cordless nailers are assembled in accordance with the ANSI Standard SNT101-2002. The finish nailer is capable of firing nails using bump actuation or sequential actuation. If you would like to have the bump actuation mode disabled, have the tool serviced by an authorized DeWALT service center. Before operating this tool, look at the selector switch to determine the actuation mode. Read all instructions before selecting actuation mode. WARNING: Keep fingers AWAY from trigger when not driving nails to avoid accidental firing. NEVER carry tool with finger on trigger. In bump mode tool will fire a nail if contact trip is bumped while trigger is depressed. SEQUENTIAL ACTUATION (FIG. 5) Use sequential actuation mode for intermittent nailing where very careful and accurate placement and depth control is desired. The sequential actuation mode provides the maximum delivery of power for driving the longest nails. To operate the nailer in sequential actuation mode: FIG. 5 1. Slide the selector switch to expose the single nail icon . 2. Fully depress nosepiece against the work surface (motor will start). 3. Pull trigger (nail will drive into work surface). 4. Release trigger. 5. Lift nosepiece off work surface. 6. Repeat steps 2 through 4 for next application. NOTICE: The contact trip needs to be depressed followed by a trigger pull for each nail followed by a release of both the contact trip and trigger after each nail. BUMP ACTION (FIG. 6) FIG. 6 Bump action is intended for rapid nailing on flat, stationary surfaces and typically most effective for applications that require driving shorter nails. When the tool is set in the bump actuation mode, two methods of tool operation are available: place actuation and bump actuation. Slide the selector switch to expose the triple nail icon . To operate the tool using the PLACE ACTUATION method: WARNING: A nail will fire each time the trigger is depressed as long as the contact trip remains depressed. 1. Depress the contact trip against the work surface. 2. Depress the trigger. To operate the tool using the BUMP ACTUATION method: 1. Depress the trigger. 2. Push the contact trip against the work surface. As long as the trigger is depressed, the tool will fire a nail every time the contact trip is depressed. This allows the user to drive multiple nails in sequence. WARNING: Do not keep trigger depressed when tool is not in use. Keep the trigger lock- off in the locked position when the tool is not in use. WARNING: When the tool's motor is running, pulling the trigger or depressing the contact trip will cause a nail to fire. Preparing the Tool WARNING: NEVER spray or in any other way apply lubricants or cleaning solvents inside the tool. This can seriously affect the life and performance of the tool. NOTE: The battery pack is not fully charged out of the carton. Follow instructions outlined (see Charging Procedures). 1. Read the Safety Instruction section of this manual. 2. Wear eye and ear protection. No Lube 3. Ensure magazine is empty of all fasteners. 4. Check for smooth and proper operation of contact trip and pusher assemblies. Do not use tool if either assembly is not functioning properly. NEVER use a tool that has the contact trip restrained in the actuated position. 5. Keep tool pointed away from yourself and others. 6. Insert fully charged battery pack. Using the Trigger Lock-off (Fig. 7) WARNING: To reduce the risk of serious personal injury, do not keep trigger depressed when tool is not in use. Keep the trigger lock-off switch LOCKED (Fig. 7) when the tool is not in use. WARNING: To reduce the risk of serious personal injury, FIG. 7 lock off trigger, disconnect battery pack from tool and remove nails from magazine before making adjustments. Each DeWALT nailer is equipped with a trigger lock-off (B) which when pushed to the right as shown in Figure 7, prevents the tool from firing a nail by locking the trigger and bypassing power to the motor. When the trigger lock-off is pressed to the left, the tool will B be fully operational. The trigger lock-off should always be locked off whenever any adjustments are made or when tool is not in immediate use. NOTICE: Do not store tool with battery pack installed. To prevent damage to the pack and to ensure best battery life, store battery packs out of the tool or charger in a cool, dry location. Loading the Tool (Fig. 8) WARNING: Keep the tool pointed away from yourself and others. Serious personal injury may result. WARNING: Never load nails with the contact trip or trigger activated. Personal injury may result. WARNING: Always remove battery pack before loading or unloading nails. Serious personal injury may result. LOAD AND DRAW METHOD 1. Insert fasteners into the rear of the magazine (G). 2. Pull pusher (H) back until the nail follower falls behind the nails. 3. Release the pusher. CAUTION: Keep fingers clear of pusher to prevent injury. UNLOADING THE TOOL WARNING: The trigger lock-off should always be locked off whenever any adjustments are made or when tool is not in use. 1. Pull and hold the pusher to the bottom of the magazine. 2. Tip the tool up until the nails slide freely out the back of the magazine. Release the pusher. FIG. 8 H 8
-
 1
1 -
2
-
3
-
4
-
 5
5 -
 6
6 -
 7
7 -
 8
8 -
 9
9 -
 10
10 -
 11
11 -
 12
12 -
 13
13 -
 14
14 -
 15
15 -
16
-
17
-
18
-
19
-
20
-
21
-
22
-
23
-
24
-
25
-
26
-
27
-
28
-
29
-
30
-
31
-
32
-
33
-
34
-
35
-
36
-
37
-
38
-
39
-
40
-
41
-
42
-
43
-
44
 |
 |