Dewalt DCS355D1 Instruction Manual - Page 15
Variable Speed Trigger Fig. 16, Lock On/Off Button Fig. 17, LED Worklight Fig. 18, Helpful Hints - lowe s
 |
View all Dewalt DCS355D1 manuals
Add to My Manuals
Save this manual to your list of manuals |
Page 15 highlights
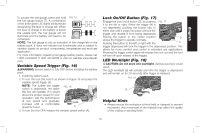
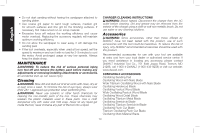
English To actuate the fuel gauge, press and hold FIG. 15 T the fuel gauge button (T). A combination of the three green LED lights will illuminate designating the level of charge left. When the level of charge in the battery is below the usable limit, the fuel gauge will not illuminate and the battery will need to be recharged. NOTE: The fuel gauge is only an indication of the charge left on the battery pack. It does not indicate tool functionality and is subject to variation based on product components, temperature and end-user application. For more information regarding fuel gauge battery packs, please call 1-800-4-DeWALT (1-800-433-9258) or visit our website www.dewalt. com. Variable Speed Trigger (Fig. 16) WARNING: Ensure switch is fully OFF before installing the battery pack. 1. Install the battery pack. 2. To turn the tool ON, hold it as shown in Figure 16 and press the variable speed trigger (A). NOTE: The further the trigger FIG. 16 switch is depressed, the faster the tool will operate. If in doubt about the proper speed for your operation, test the performance at low speed and gradually increase until a comfortable speed is found. A 3. To turn the tool OFF, release the variable speed switch (A). Lock On/Off Button (Fig. 17) Engage the lock on/off button (D), by pushing FIG. 17 it to the left or right. When the trigger (A) is not depressed, pushing the button fully to either side until it snaps into place will lock the trigger and disable it from being depressed. Placing the button in the center position D allows the trigger to operate normally. Pushing the button to the left or right with the A trigger depressed will lock the trigger in the depressed position. This allows for more comfort and control in extended use applications. Pressing the trigger switch again will release the lock out and the tool will turn off upon release of the trigger. LED Worklight (Fig. 18) CAUTION: Do not stare into worklight. Serious eye injury could result. The LED worklight (B) will activate any time the trigger is depressed and will remain on for 20 seconds after trigger is released. FIG. 18 B Helpful Hints • Always ensure the workpiece is firmly held or clamped to prevent movement. Any movement of the material may affect the quality of the cutting or sanding finish. 13
-
 1
1 -
2
-
3
-
4
-
5
-
6
-
7
-
8
-
9
-
 10
10 -
 11
11 -
 12
12 -
 13
13 -
 14
14 -
 15
15 -
 16
16 -
 17
17 -
 18
18 -
 19
19 -
 20
20 -
21
-
22
-
23
-
24
-
25
-
26
-
27
-
28
-
29
-
30
-
31
-
32
-
33
-
34
-
35
-
36
-
37
-
38
-
39
-
40
-
41
-
42
-
43
-
44
-
45
-
46
-
47
-
48
-
49
-
50
-
51
-
52
-
53
-
54
-
55
-
56
-
57
-
58
-
59
-
60
 |
 |
