Dewalt DW7440RS Instruction Manual - Page 4
ASSEMBLY, Attaching the Wheels and Axle, Attaching the, Kickstand, Rubber Bumpers - saw stand
 |
View all Dewalt DW7440RS manuals
Add to My Manuals
Save this manual to your list of manuals |
Page 4 highlights
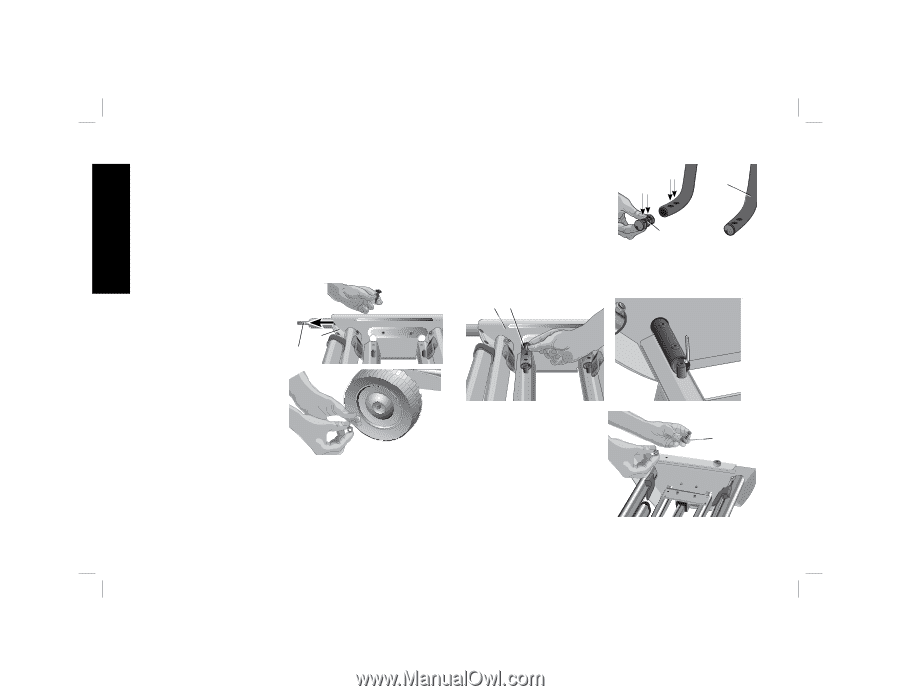
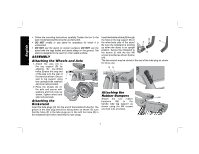
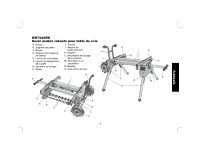
English • Follow the mounting instructions carefully. Fasten the tool to the saw mounting brackets securely as instructed. • DO NOT modify or use stand for operations for which it is unintended. • DO NOT use the stand on uneven surfaces. DO NOT use the stand with the legs folded and stand sitting on the ground. The stand is designed to be used on a flat, stable surface. ASSEMBLY Attaching the Wheels and Axle 1. Attach the axle (A) to the leg support (B) by aligning the pre-drilled holes. Ensure the long end of the axle is to the rear of B the stand as shown. Secure axle to leg support using A two carriage bolts, washers and lock nuts provided. 2. Place the wheels (C) on the axle and secure with washers and lock nuts as shown. Tighten wheel and axle nuts securely. Attaching the Kickstand Insert the tube plugs (O) into the end of the kickstand tube (N). The groove in the tube plug should be facing down as shown. Be sure that the holes (P) in the tube plugs are in line with the holes (Q) in the kickstand tube before inserting the tube plugs. Insert the kickstand tube (N) through the holes in the leg support (B) on Q N the wheel-axle side of the stand. P Be sure the kickstand is pointing up when the stand is an upright position. Secure the kickstand to the beams (I) with the four M6 O screws provided as shown (below, left). The hex wrench may be stored in the end of the tube plug as shown for future use. BN Attaching the Rubber Bumpers Attach the two rubber M bumpers (M) to the handle side leg support as shown using the M4 screws and lock nuts provided. 3
-
 1
1 -
 2
2 -
 3
3 -
 4
4 -
 5
5 -
 6
6 -
 7
7 -
 8
8 -
 9
9 -
 10
10 -
11
-
12
-
13
-
14
-
15
-
16
-
17
-
18
-
19
-
20
-
21
-
22
-
23
-
24
 |
 |