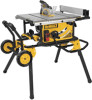
Dewalt DWE7491RS Instruction Manual - Page 15
Dust Collection Fig. 43, Miter Gauge Operation, Dado Cutting, Featherboard Construction Fig. 41, 42 - dado throat plate
 |
View all Dewalt DWE7491RS manuals
Add to My Manuals
Save this manual to your list of manuals |
Page 15 highlights
English FIG. 40 FIG. 41 24" (610 mm) 4" (102 mm) THE KERF SHOULD BE ABOUT 1/4" (6.4 mm) APART 3/4" (20 mm) J Miter Gauge Operation To set your miter gauge: 1. Loosen the miter gauge lock handle. 2. Move the miter gauge to the desired angle. 3. Tighten the miter gauge lock handle. COMPOUND MITERING This is a combination of bevel crosscutting and mitering. Follow the instructions for both bevel crosscutting and mitering. Dado Cutting CAUTION: Do not attempt to stack dado blades thicker than 13/16" (20 mm). Do not use dado blades larger than 8" (200 mm) diameter. Since dado cuts are not thru-cuts, the cuts must be performed with the blade guard assembly removed. To remove the blade guard assembly, pull riving knife/blade guard release lever and pull up on the guard or riving knife to remove. When using the dado, the special dado insert (also sold as an accessory) must be used. Anytime a cut is required that is considerably wider than the saw kerf, a dado is used. A dado cut is commonly used to add support and line up a shelf for a cabinet, bookcase or some such project. When using the dado, the blade guard assembly must be removed. Use EXTREME care when using the dado without the blade guard assembly and riving knife. If a deep cut is required, use several successive passes rather than attempting to make it with one pass. Maximum dado width on this saw is 13/16" (20 mm). DO NOT USE WIDER COMBINATIONS. CAUTION: Always check dado blade clearance before plugging in the saw. Be sure to place the blade guard assembly and standard throat plate back in position and check adjustments when the dado cuts are complete. Reinstall blade guard assembly, anti-kickback assembly and riving knife. Featherboard Construction (Fig. 41, 42) Featherboards are used to keep the work in contact with the fence and table, and help prevent kickbacks. Dimensions for making a typical featherboard are shown in Figure 41. Make the featherboard from a straight piece of wood that is free of knots and cracks. Clamp the featherboard to the fence and table so that the leading edge of the featherboard will support the workpiece until the cut is complete (Fig. 42). An 8" (203 mm) high flat board can be clamped to the rip fence and the featherboard can be clamped to the 8" (203 mm) high board. 60º 5" (127 mm) WARNING: Use featherboards for all non thru-sawing operations where the blade guard assembly, anti-kickback assembly and riving knife cannot be used. Always replace the blade guard assembly, anti-kickback assembly and riving knife when the non thrusawing operation is complete. Make sure the featherboard presses only on the portion of the workpiece in front of the blade. FIG. 42 Dust Collection (Fig. 43) FIG. 43 This table saw is equipped with a dustshroud and dust collection port. For best results, YY connect a vacuum to the port at the rear of the saw and on the guard using a Y connector. After extended use, the saw's dust collection system may become clogged. To clear the dust collection system: 1. Unplug the saw. 2. Turn the saw on its side, so the bottom, open part of the unit is accessible. XX 3. Open the dust access door (XX) shown in Figure 43 by pressing the the side clips (YY). Clean out the excess dust, and re-secure by pushing the side clips completely into place. 13
-
 1
1 -
2
-
3
-
4
-
5
-
6
-
7
-
8
-
9
-
 10
10 -
 11
11 -
 12
12 -
 13
13 -
 14
14 -
 15
15 -
 16
16 -
 17
17 -
 18
18 -
 19
19 -
 20
20 -
21
-
22
-
23
-
24
-
25
-
26
-
27
-
28
-
29
-
30
-
31
-
32
-
33
-
34
-
35
-
36
-
37
-
38
-
39
-
40
-
41
-
42
-
43
-
44
-
45
-
46
-
47
-
48
-
49
-
50
-
51
-
52
-
53
-
54
-
55
-
56
 |
 |
