Dymo LabelManager 500 Touch Screen Label Maker User Guide 1 - Page 13
Printing Options - s mark
 |
View all Dymo LabelManager 500 Touch Screen Label Maker manuals
Add to My Manuals
Save this manual to your list of manuals |
Page 13 highlights
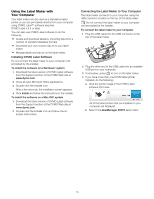
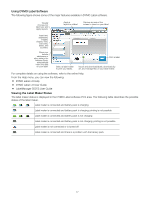
Editing Labels and Folders You can rename, cut, copy, and paste labels and folders to keep your labels organized. To rename a label or folder 1 Select the check box next to the label or folder you want to rename. 2 Tap Edit, and then tap Rename. The Rename dialog box appears. 3 Enter a new name for the label or folder in the New name box, and then tap Rename. To cut or copy labels and folders 1 Select the check box next to each label or folder you want to cut or copy. 2 Tap Edit, and then tap one of the following: • Cut - to cut the labels and folders • Copy - to copy the labels and folders To paste labels and folders 1 Cut or copy the labels or folders you want to paste. 2 Navigate to the folder where you want to paste the labels or folders. 3 Tap Edit, and then tap Paste. The labels or folders are pasted to the selected location. Clearing Recently Printed Labels You can quickly clear all recently printed labels from the label maker memory. Clearing recently printed labels clears this list of labels for all users. To clear recently printed labels 1 Tap on the Home screen. 2 Select Manage Files from the Settings list. 3 Tap Clear recently printed. A message appears asking if you want to delete recently printed labels for all users. 4 Tap Yes. Managing Custom Clip Art You can delete custom clip art images that you previously downloaded to your label maker. See Using the Label Maker with Your Computer on page 16 for more information about downloading clip art. To delete custom clip art 1 Tap on the Home screen. 2 Select Manage Files from the Settings list. 3 Tap Downloaded Clip Art. The Manage downloaded Clip Art screen is displayed. 4 Select the images to delete. To select all images, tap Select all. 5 Tap Delete. A message appears asking if you want to delete the selected images. 6 Tap Delete. Printing Options You can choose to print multiple copies of the same label. By default, each label is automatically cut after printing. However, you can choose to turn this auto-cut feature off. If you turn off the auto-cut feature, you can also choose whether or not to print cut marks between each label. Printing a Series of Labels You can create a series of labels by using autonumbering or by inserting day, month, or quarter names on your labels. For more information about using these features, see Using Auto-Numbering and Inserting Days, Months, or Quarters on page 10. You cannot print multiple copies of a series of labels. To print a series of labels 1 Create a series of labels by using auto-numbering or by inserting day, month, or quarter names on your label. 2 Press . The Print preview screen appears. 3 Swipe to the left or right to view each label in the series. 4 Tap Print. Printing Multiple Copies You can print up to 49 copies of a single label at one time. To print multiple copies 1 Press . The Print preview screen appears. 2 Select the number of copies to print in the Number of copies box. 3 Tap Print. 13
-
 1
1 -
2
-
3
-
4
-
5
-
6
-
7
-
 8
8 -
 9
9 -
 10
10 -
 11
11 -
 12
12 -
 13
13 -
 14
14 -
 15
15 -
 16
16 -
 17
17 -
 18
18 -
19
 |
 |